Let’s say you have a 320pixels x 240pixels movie and you want to upload it to a video channel? Then you need to adapt your video so that it will not stretch and look blurry. There is a rather simple trick for that: importing your video into a new one which is 480×360 pixels. That way, you do not need to resize the original video. Below we have an example of a video (click twice if you are on IExplorer):
This original is 289x193pixels. If we were to upload it to YouTube, it would look like this:

To avoid this kind of deformation, we use our little trick described below.
![]() Below you find the text tutorial, if you rather like to see the video tutorials, go to the member area. If you are not a member yet, you can join up now.
Below you find the text tutorial, if you rather like to see the video tutorials, go to the member area. If you are not a member yet, you can join up now.
How to get this to work
You can use the following software to do this:
- Adobe Flash
- Adobe AfterEffects
- Techsmith Camtasia
There are of course other editors, like Adobe Premiere and FinalCut Pro (Mac), but I do not use those myself. Basically, any video editor that can combine several videos with different sizes is great for this purpose. You are welcome to tell me your favorite and why in the comment box below.
The first thing you need to do is to create a new movie with dimensions 480 x 360 and select a background color that fits with the colors of your movie. In most cases black is the best choice since it is neutral and it will not clash with anything in your movie. If you do not have the option to set the background color (depending on which application you work with), you can create an image of 480×360 pixels in the color of your choice and import that into your project. Once you have set the color or placed the image, you can import your movie into the project and then position it in the middle of the composition window or for a special effect, offset it against the middle. (The composition window can have another name, depending on your editor: sometimes it is called project window, canvas, work area, composite window…)
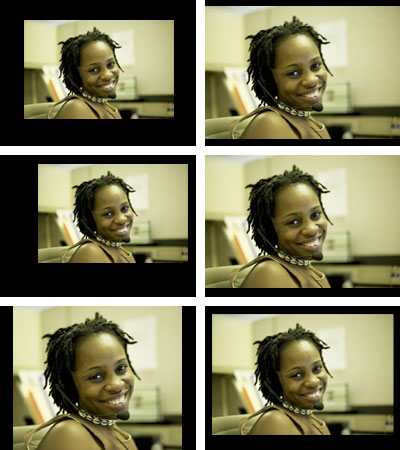
Below you see a couple of ways to position your movie in a larger area:
Once you have done that and ensured that there are enough frames in the timeline to show the full movie (some editors require that you set the length upfront), you can export the movie as a QuickTime movie with compression set to “None“. When done, you will now have a master video that remains the same quality as the original.
Why QuickTime? Is is the most used format across video networks.
If the result is bigger then 1GB, you could apply a little bit of compression by selecting:
- “MPEG4” with Quality set to “Best“
- “Key frames” set to 1 or maximum 5
As explained in Recommended movie settings for YouTube, the reason why you should not upload a compressed movie to most video channels is that, regardless of what you did, the channel will compress it anyway. And compressing a movie twice results in bad quality.
There is one exception: FLV compression! FLV as a format becomes available in more and more video editors, this is the preferred compression method because video channels do not tamper with an flv during upload. In other words, what you upload is what you get.
Alas, on YouTube, FLV can go wrong sometimes. You may experience bad sound or image quality. In that case, upload the uncompressed Quicktime format. I have to say, it becomes increasingly difficult to get good results on YouTube, even with uncompressed video.
Adding text, banners or ads
If you have a lot of space around your original movie in the project windows, you can even add additional texts or a logo if your movie editor permits you to do so. This way, your movie will not look as if it swims in a rectangle and you can add some interesting info, like an url, a banner or text advertisement, which is a nice bonus for the extra work you did.
Thanks your information. It’s really help you. I now encounter this problem. Thank you!
Thanks for sharing this post.It is truely a useful information for me
This was actually a fascinating subject, I’m very fortunate to be able to find this from yahoo.
That is really nice information. I would gonna have a try. Thanks
am using avs v7.1 only to convert wide screen movies to full screen from .avi to dvd format.have done everything i want but the resultant dvd has NO AUDIO. am really foxed what to do. i am an amature at this and tried it for the first time today. it is really bugging that i do not get sound. the output folder setting show MP2 audio and i think that should be changed to MP3 BUT JUST CANNOT GET TO DO that. can you help?? thanks in advance. Could you mail me the right way of doing it please? Thanks
Percy
Percy, I’m sorry but that is a bug in the software. Nothing can be done about it. I wrote to them about this, though. I only use the software for specific tasks, like converting to MP4, etc…
aku ra weruh arep nulis opo , seng penting aku ninggalne komeng neg kene
Hi, I wish for to subscribe for this weblog to take most recent updates,
so where can i do it please help.
You can subscribe via the Join Up! page at the top.
https://www.miracletutorials.com/newsletter/
My daughters were singing and they took video from back of audience. I would like them to
appear closer so I can see there faces. Can you help me.
Hi Linda,
It depends on the resolution of the video and whether the video images are sharp enough.
I can have a look at the video if you like. In that case just let me know and I’ll contact you by e-mail so that you can send me a dropbox or WEtransfer link.