Update 30 July 2022
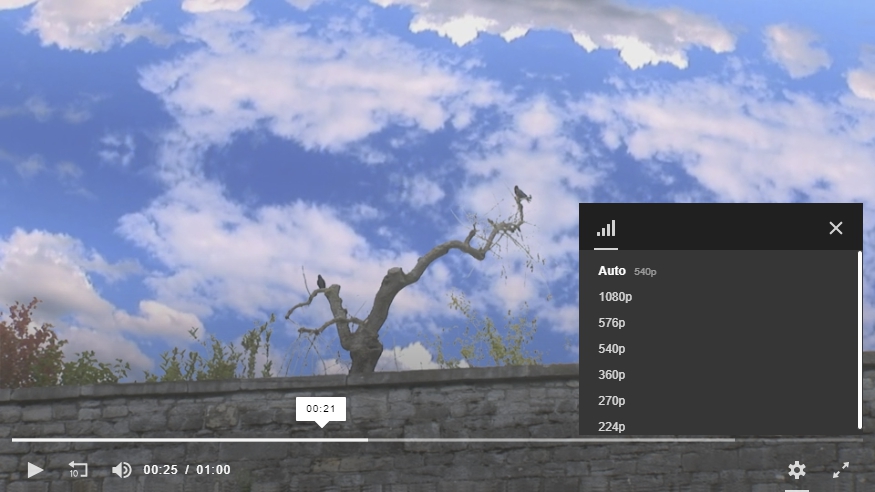
What bitrate to use for HLS adaptive streaming video is a question many people struggle with. Bitrate (or “Bit rate” in proper English) is the amount of bits needed to produce a second of video footage. In this tutorial we try to give you the ideal bitrate to use per video resolution. Although it depends on the original video, there are some general standards you can use. Below you find a comparison table of encoding presets with bitrate settings derived from Amazon Web Services(AWS) via Elastic Transcoder, which is their online video converter tool. We also provide a handy bitrate calculator in this tutorial, click here to jump right to it.
Overview of HLS encoding presets on AWS
| Preset name | Resolution (pixels) | Video Bit rate (kbps) | Audio bitrate (kbps) |
| System preset: HLS 400k | 400 x 288* | 272 | 128 |
| System preset: HLS 600k | 480 x 320 | 472 | 128 |
| System preset: HLS 1M | 640 x 432 | 872 | 128 |
| System preset: HLS 1.5M | 960 x640 | 1372 | 128 |
| System preset: HLS 2M | 1024 x 768 | 1872 | 128 |
Although these presets are fine if you have an original video that isn’t much bigger than 1024 x 768, you may find this isn’t enough if you have HD videos of 1280 x 800 or higher. Nor are these settings useful for high motion videos since the Video Bit rates are rather for videos with little or no motion (more about that later). Other video platforms like Wowza are quite conservative as well with the resolutions they offer in their standard sets.
Luckily, you can create extra encoding presets on Elastic Transcoder. Below you find a comparison table for higher resolution videos:
| Preset name | Max. Resolution | Video Bit rate (kbps) | Audio bitrate (kbps) |
| HLS 2.5M – custom | 1280 x 720* | 2508 | 192** |
| HLS 3M – custom | 1440 x 820 | 3000 | 192 |
| HLS 4M – custom | 1920 x 1080 | 4000 | 192 |
(*) The last value is generally used to show the resolution in a player, like 720p, 820p, 1080p. Note that these are maximum resolutions, the end result may be a little different. It depends on the relationship between width and height of your original video, also called aspect ratio.
(**) Note that the audio bitrate is higher here as well. While providing higher resolution video, you might as well bump up the audio if the original video has an audio bitrate of 192kbps or higher.
The presets mentioned above work fine for us, but it depends on the original master videos. If they have a lot of movement, you have to increase the video bitrates. The bitrates shown in the last table above are fine for video with rather static scenes, like talking heads or footage shot from a tripod.
There is a useful formula to calculate the ideal bitrate per resolution, known as the Kush Gauge, invented by the computer scientist/artist Kush Amerasinghe who works for AdobeSystems. The Bitrate Calculator below is based on this formula, you can use it to calculate it for yourself:
The formula works like this: width * height * frames per second * motion factor * 0.07.
Frames per second is the frame rate or the images per second to create the motion.
Motion factor determines the amount of movement in a video, where 1 =little motion, 2 = moderate motion, 3 =more motion , 4 = high motion. According to Kush, motions factors are categorized like this:
- 1. Low motion is a video that has minimal movement. For example, a talking head in front of a camera while the camera itself and the background is not moving at all.
- 2. Medium motion would be some degree of movement, but in a more predictable and orderly manner, which means some relatively slow camera and subject movements, but not many scene changes or cuts or sudden snap camera movements or zooms where the entire picture changes into something completely different instantaneously.
- 3. Is not explained but is obvious a situation between 2 and 4.
- 4. High motion would be something like the most challenging action movie trailer, where not only the movements are fast and unpredictable but the scenes also change very rapidly.
Based on these motion factors, it is rather easy to determine the bitrate for HLS. For instance: a video with a lot of movement, like a football match with close-ups, may need a motion factor of 4, resulting in:
1280 * 720 * 30 * 4 * 0.07 = 7741
This actually means that you need an internet connection with a download speed of at least 8Mbps to watch a video comfortable.
A 1920 x 1080 high motion video would require around 18Mbps. Depending where you live, quite a few Wifi internet connections don’t go higher than 2Mbps to 10Mbps, but that is why you provide lower resolutions as well, no worries there with HLS. Incidentally, you can test your own internet connection speed with https://fast.com/
Using the Kush gauge, below you find a rule of the thumb table for high motion videos, like sports events, action film, etc.:
| Preset name | Max. Resolution | Video Bit rate (kbps) | Audio bitrate (kbps) |
| HLS 2.5M – custom | 1280 x 720 | 3870 – 7740* | 192 |
| HLS 3M – custom | 1440 x 820 | 4960 – 9918 | 192 |
| HLS 4M – custom | 1920 x 1080 | 8709 – 17418 | 192 |
(*) You best experiment within these values to see what gives the best result. The lowest value is for average motion (2) with not too much dramatic changes. The highest value(4) for action movies.
In Elastic Transcoder you can also set Max bit rate and Minimum bit rate but setting the maximum too low may cripple quality. We prefer using the Bit rate field instead and give one value.
How to make a custom encoding preset in Elastic Transcoder?
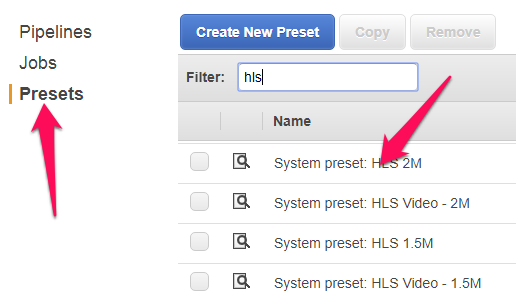
We created these encoding presets starting from a copy of a system preset in Elastic Transcoder.
In the AWs console, go to Services > Elastic Transcoder or go here directly: https://console.aws.amazon.com/elastictranscoder/ and select Presets on the left (after you logged in).
There you select the System preset: HLS 2M
When you select that preset, the Copy button above becomes enabled:
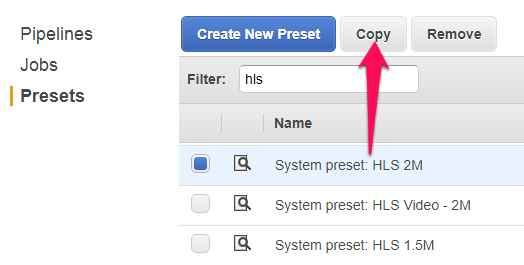
Click on the Copy button above t make a copy of that preset. Although you can view the settings of a System preset, it is not possible to change it. Working with copies is a safety measure so that you don’t accidentally mess up a preset. In the copy you just made, you only need to adapt a few things, beginning with the Name field in the preset:
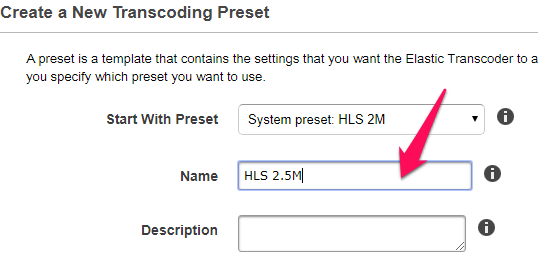
Give it a meaningfull name. Then scroll down until you see the Bit Rate, Max Width and Max Height fields:
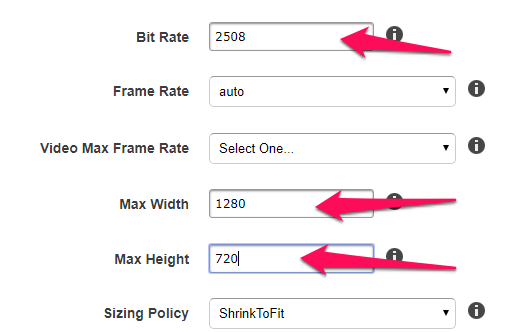
Adapt those fields to your needs, eventually using the Bitrate calculator for the Bit rate field. When you are done, scroll all the way down until your see a blue button Create Preset on the bottom right.
When you click that button, you probably get a warning about the preset not being compatible:
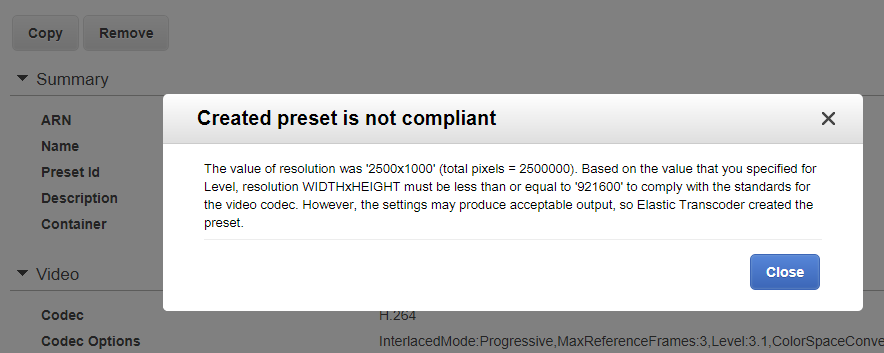
If in the last sentence it says “However, the settings may produce acceptable output, so Elastic Transcoder created the preset.”, you are good to go. Otherwise, read the warning carefully and adapt the preset until it works. When you forget to fill in an important field or gave a wrong value, the preset will not save. Scroll up again in that case to find the errors which are indicated in red. Once you solved those, press the Create Preset button again.
You can change other values in presets also but some of them are quite technical. A full overview of preset values can be found here for the technically inclined:
https://docs.aws.amazon.com/elastictranscoder/latest/developerguide/preset-settings.html
How to produce the HLS adaptive streaming video segments and playlist manifests themselves with Elastic Transcoder is explained in this step by step tutorial: https://www.miracletutorials.com/hls-adaptive-streaming-tutorial-with-cloudfront-jw-player/
How is the bandwidth limit determined in a manifest?
You don’t need to worryabout that when using Elastic Transcoder, but here is some useful information about it:
The BANDWIDTH attribute must be an upper bound of the overall bitrate of each video segment + container overhead. Whether you use a system preset or a custom one, Elastic Transcoder sets the minimum BANDWIDTH requirement automatically to the video segment with the highest bitrate when the video conversion is done. Elastic Transcoder does therefore its best to calculate the ideal BANDWIDTH limit for you and puts in the m3u8 manifest.
A possible outcome:
BANDWIDTH=476000,RESOLUTION=400×288
BANDWIDTH=708000,RESOLUTION=480×320
BANDWIDTH=1177000,RESOLUTION=640×432
BANDWIDTH=1780000,RESOLUTION=960×540
BANDWIDTH=2356000,RESOLUTION=1024×768
BANDWIDTH=4908000,RESOLUTION=1920×1080
The values for BANDWIDTH are expressed in bits per seconds (bps). Expressed in kilobits per second, you need to divide those values by 1000. 2356000 = 2356Kbps which is equal to 2.4Mbps. This means that if the internet connection has a speed between 0.708Mbps and 1.177Mbps, the 480 x 320 version is shown. A speed of 5Mbps will be able to play the 1920 x 1080 version (at least in this example). Note that each video converted to HLS, even with the same resolution as above, probably results in different minimal bandwidth limits.
What if videos have other dimensions?
The videos can have different width and height dimensions (aspect ratio) from the SD and HD standards. A video can be 1440 x 410 or 1920 x 1000, for instance. There are also portrait videos from mobiles. In some cases, you will need to create custom presets, though. We experienced deformation problems with a 1440 x 410 video when using a preset for 1440 x 820 resolution, so we made an extra preset with these specific dimensions.
Most offline video players respect the dimensions of a video but on the internet you may find players that do not. JW Player offers the option to set the player’s behaviour to uniform, which means that the video is displayed as intended, whether embedded in a page or full screen, in progressive download, HLS and MPEG-DASH.
How many bitrate versions do I need?
You are not obliged to use as many bitrate versions of the videos as suggested above. A minimum would be 3, like; 320p, 512p, 720p, which correlates roughly to 480 x 320, 960 x 512, 1280 x 720. The length of a video has no importance in that respect since HLs videos are served piecemeal in segments of xx seconds (more about that further down).
We generally use between 5 and 6 different bitrate versions, again depending on the original videos.
It stands to reason that the more bitrate versions you have, the more fine grained is the experience of the visitor when diverse internet fluctuations occur. That said, 5 or 6 different bitrate versions are often more than enough. Incidentally, quite a few professionals leave out the 1440 x 820 option, jumping from 720p to 1080p, in favour of more fine grained lower options towards mobile connections.
At this time of writing 4K video is still a little heavy to consider as a standard option but if you know that your specific audience has a high speed broadband connection, you can create bitrates versions for that as well.
We did create Elastic Transcoder presets for clients who worked with 3D VR video, which are 4K and for them it works well.
Upscaling a video?
Important to note is that you never upscale a video via a video editor or converter. That is to say, don’t use or create a preset that outputs a video version that has a higher resolution than the original. Same goes for the Audio bitrate. It wastes bandwidth for nothing because the quality doesn’t improve at all. On the contrary, an upscaled video may contains blurry sections or strangely pixelated areas (artefacts) and the bandwidth costs go up needlessly for everyone involved (you and the visitors).
That said, today there are Artificial Intelligence video upscalers that do quite a good job. You may like to check the tools available at Topaz Labs or runaway.io. If you upscale the video before uploading it to AWS, then you are good to go.
How long should I set the video segments?
HLS breaks up the video in segments. The shorter the segments are, the quicker a video player reacts to fluctuations of the internet connection. Unfortunately, Apple’s IOS devices, including iPad and iPhone, require segments of 10 seconds. Since these devices have a considerable market share, you may want to keep that in mind and set therefore the segments to 10 seconds. It means that when a fluctuation in the connection occurs, the quality of the video will adapt itself only when the player is at the end of a segment. This may be quite apparent at the beginning of a video, which starts with a low quality version. When you try to select a higher resolution, it will only react when that first segment of 10 seconds has passed.
In that sense MPEG-DASH is better as you can set it to 2 second segments, even for Apple devices, but this format is not supported by all major browsers at this time of writing.
If you have questions or comments, you can react below.
Thank you so much for the above information. You have no idea what a great starting point its been. There is not that much information out there on setting this up correctly.
Right now I am uploading a 1920×1080 .mov file. I have gone through just about everything trying to get this video to stream with grat quality. I have no idea what I am doing wrong here. I keep comparing the stream to an encoded and compressed (beautifully by elastic transcoder) MP4 but the quality of the streaming still seems blurry. The source file is a 1.5GB mov file and the MP4 is 1.52
Right now my HLS setting are as follows and the quality is still not clear.
25,000 bit rate, level 4.1, fames 8, max frame rate to 60, profile @ high, max number of frames between key frames 90, codec H264, sizing policy shrink to fit, padding policy – nopad, display aspect ratio auto,
Any help would be amazing. I have been working on this now for almost a week and not seeing the light at the end of the tunnel
Based on everything it feels like im doing it all right.
Sorry for the late answer, Nick.
I see you’ve set max frame rate to 60. Does that mean your video has 60 frames per second? If it has not, it is better to leave this to auto, so that Elastic Transcoder uses the original frame rate of the video. I’m not saying this is the cause of the quality loss because 25,000kbps should be sufficient, even with 60 frames per second, unless it is a high motion video, in which case 34,000kbps would be better, at least for a resolution of 1920×1080.
That said, E.T. doesn’t add extra frames via that field it only determined the maximum frame rate.
Have a look at the frame rate field. Is that 60 also? This should be auto or the actual frame rate of the original.