A step-by-step HLS adaptive streaming tutorial with CloudFront & JW Player in two parts. It is easier than you think. This tutorial presumes you have already an Amazon Web Services account (AWS) and a premium license of JW Player 6 or 7.
The advantage of HLS adaptive streaming is that you can serve videos according to the bandwidth and screen resolution of the visitor to provide a smooth playback experience. View our example.
For HLS adaptive streaming, you use a M3U8 manifest file which contains so-called variant playlists, JW Player automatically starts playing the highest quality stream that fits the bandwidth and the screen size. It automatically adjusts the stream if the bandwidth increases or decreases during playback.
The manifests are created for you in the AWS console, you just have to follow a certain procedure.
HLS involves a bit of work, but once you have setup the presets in AWS, the next video setup is much easier. Let’s jump into it right now.
Creating your buckets
What you need to start with is to create 3 buckets:
- A bucket that contains the video you want to process.
- A bucket for the output of the video in segments
- Optional, a bucket for preview images.
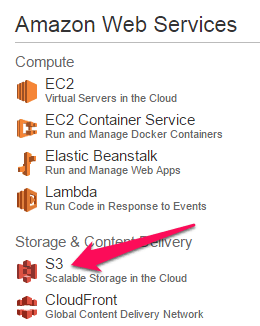
Go to the AWS console and select the S3 service:
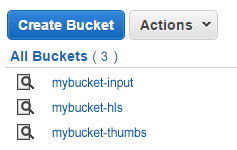
To make it easy to recognize buckets later on, best use a naming convention like this:
- mybucket-input
- mybucket-hls
- mybucket-thumbs
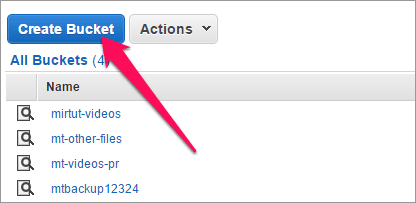
Creating buckets in S3 is easy. Once you are in the S3 service, click on Create bucket:
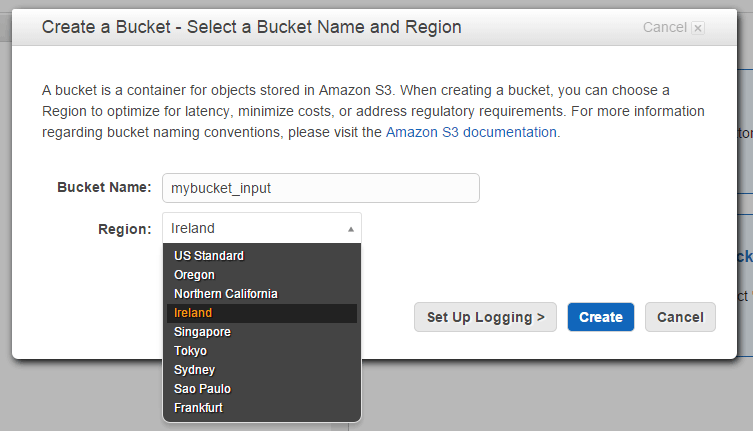
Give a bucket name. Note that special characters are prohibited in buckets names and they have to be unique across the AWS network. If a name is already taken, change it. Then, select the Region closest to you:
Repeat this with the other two buckets. For this tutorial we work with public videos, but we leave the buckets themselves private, so that no one can read what is in them. It is not a huge safety measure, but it helps prevent automated scripts from listing objects. You should have something like this now:
Uploading a video
We are going to upload a video now. This should be a MP4, codec H264, AAC audio. Best use a video with minimal compression, because once we start processing the video for HLS streaming, more compression will be applied and this seldom gives good results.
Select the mybucket-input bucket in that list. Your bucket has of course another name, but to keep it simple, we refer to the naming convention outlined above.
Since this is a new bucket, no files are to be found yet:
Click the Upload button and locate your video. Just follow the instructions in the upload panel, it is easy. Depending on the weight (MB’s), this may take a while:
Don’t navigate away from the page until it is done, although you can do other stuff on your computer in the meanwhile.
Once the video is uploaded, it is automatically listed on the left. This video does not need to be public, because we are going to use Elastic Transcoder of AWS to convert the video in chunks of 10 seconds.
Creating a M3u8 manifest and process the video
Elastic Transcoder is an online video and audio converter with many options. We use it to do the following:
- Create a Pipeline, which determines the input and output buckets and the Preset to use.
- Create a Job, to break up the video in segments and create the m3u8 manifest in one go.
If that sounds like Chinese to you, don’t worry, all will be explained.
Creating a Pipeline
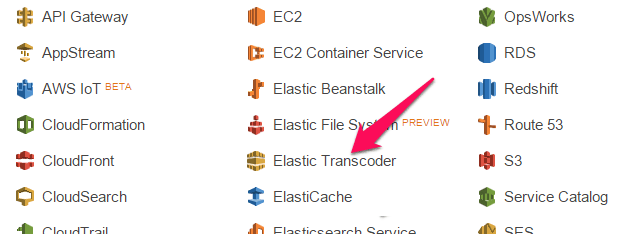
Select the Elastic Transcoder service (you don’t need to sign up for this):
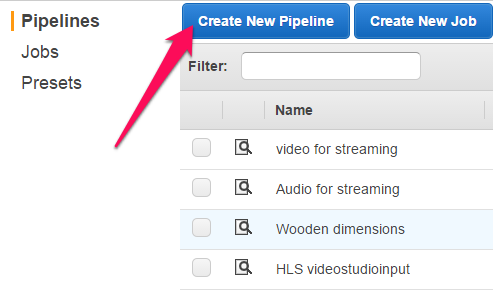
On the left, you see links to the Pipeline, Jobs and Presets:
Possibly, you have already Pipelines setup, which are listed on the right. But for HLS Streaming, we need to setup a new one. Click the Create New Pipeline button.
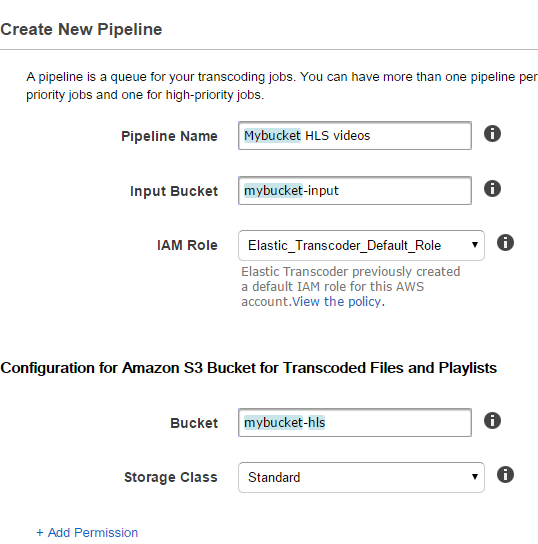
In the following screen, fill in the details as described below:
Pipeline Name: Give this a convenient name to remember.
Input Bucket: When you click in the field, you get a dropdown with buckets. Select the input bucket which contains your video.
IAM Role: Leave as is. If you don’t have one already, it will be created for you.
Bucket: is where the converted segments of the video and the m3u8 manifests are placed. In our example mybucket-hls.
Storage class: Standard. Other options are not useful in this case.
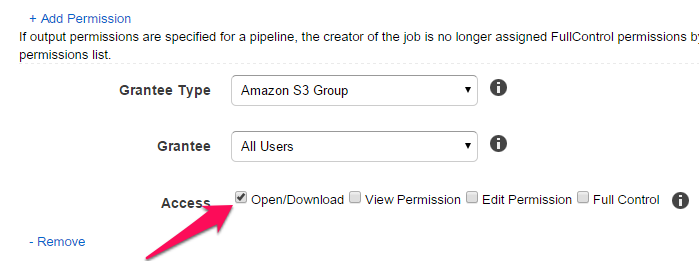
Click the +Add Permission link, to make the files public in the output bucket, so that the manifests have access to them:
Grantee Type: Select Amazon S3 Group
Grantee: All Users
Access: Only select Open/Download, nothing else.
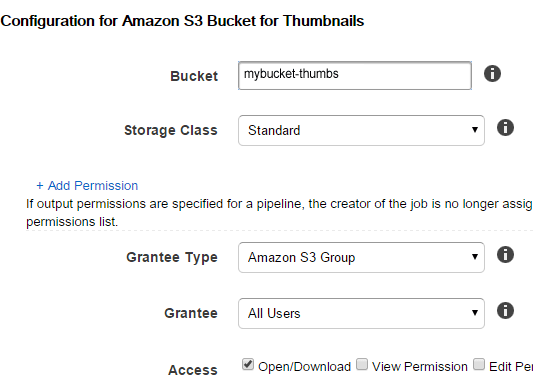
The next step is not strictly necessary. But if you want Elastic Trascoder to create a thumbnail for you to use as a poster image (the preview image in the player), then scroll down to designate the bucket for poster images:
This follows the same rules as previously described, except that you select the mybucket-thumbs bucket.
To be honest, it is often better to create a poster image by hand and upload it to any bucket you like (as long as the image itself is made public). But the method above may speed up things for you.
Scroll down and on the bottom right, click on the blue Create Pipeline button.
The next thing we have to do is create a Job.
Create a Job
This is where everything is going to happen. With a Job, you create the video segments and the m3u8 manifests.
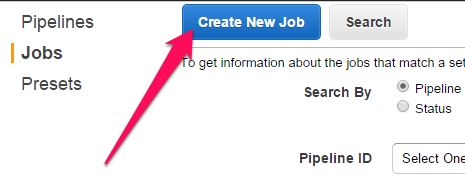
Click on the link Job on the left and click on the Create Job button:
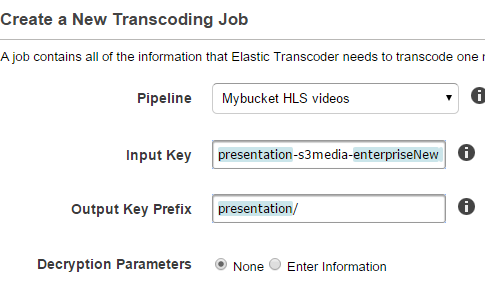
In the following panel, fill in the first group of details:
Pipeline: Slect the one you just created.
Input Key: Select the video by clicking in that field to open the dropdown box with existing videos in the mybucket-input bucket.
Output Key Prefix: This is used to organize the video segments and manifests in its own folder. Note the slash at the end.
Scroll down to Output Details:
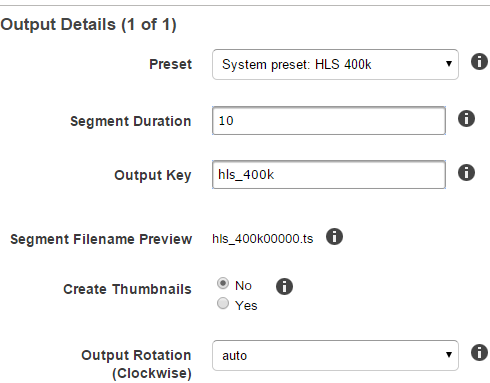
Preset: The system HLS presets are fine. Select first System preset: HLS 400k.
Segment duration: Apple recommends segments of 10 seconds. You can change that if you like, but this is the ideal length.
Output Key: Give a prefix for each segment. Since you chose the 400 kbs bitrate preset, indicate it more or less as shown.
Segment Filename Preview: is a preview of the segment names influenced by the previous field.
Create Thumbnails: Leave it to No, this resolution is not good enough to create a poster image.
Ouput Rotation: Auto.
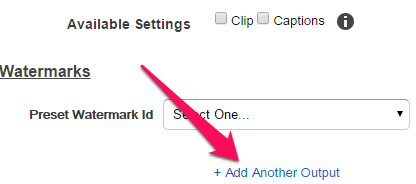
Now, we setup a preset for 600kbs, 1MBs, 2MBs, 4MBs. Scroll a little down until you see the +Add Another Output link:
A new group of Output Details shows up. Repeat the same as previously, but this time select System Preset HLS 600k, Segmentation: 10, Output Key: something similar like hls_600k.
Add another one and select System Preset HLS 1M, after that create the last one with System Preset HLS 2M.
With this done, we create 4 formats in one go, respectively 400k, 600k, 1MB and 2MB bitrate segments, all neatly named according to the Output key prefixes. But we are not done yet with this Job. We have to create the manifests as well.
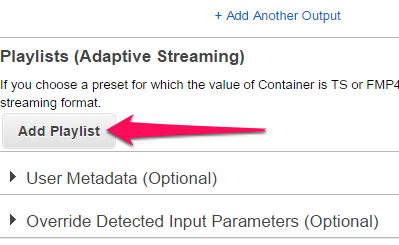
Scroll down to where you see a button Add Playlist:
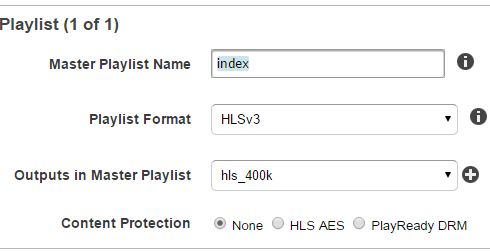
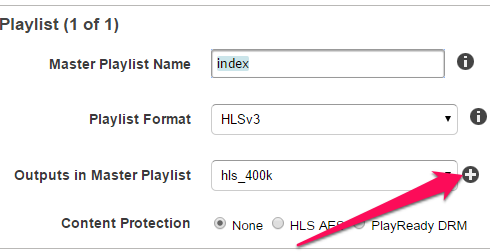
In the following part you get the following fields:
Master Playlist Name: Usually we call this index since it is the master manifest which will call the others.
Playlist Format: Select HLSv3
Outputs in Master Playlist: Select first the 400k version.
Now click the + sign next to that field to add the following Output:
This time, select hls_600k, then repeat this until all 4 formats are included. This will create separate manifests for each bitrate version.
Then scroll down until you see the blue Create Job button. Click on it.
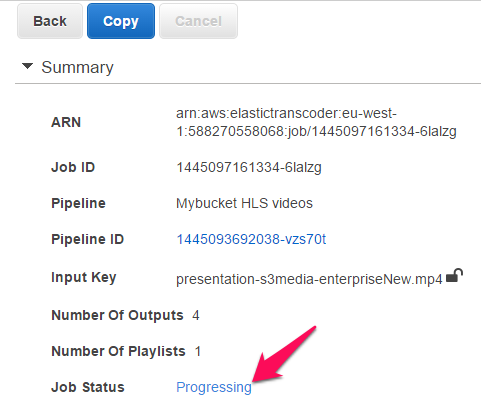
Elastic Transcoder now processes everything for you. It shows a status of the job and all the details involved:
With the example video I used, which is 7 minutes in length, it took about 5 minutes. You can refresh the screen from time to time to see if it is finished yet. If the status is Complete, the job is done.
You can check the bucket, to see everything is there. Go to the S3 service and select the bucket which should contain the video segments, in this example mybucket-hls. You will notice that there is a folder with the name you designated in the Output Key Prefix. Click on the folder to open it.
There should be a a whole range of .ts files and .m3u8 manifests. The one we will need is the index. m3u8 manifest to load into the player. But before we can do that, we have to create a crossdomain.xml file, so that we can give the Flash player permission to access the files. This is important because we will call video segments that are located on another server within our website which is hosted elsewhere.
Create and upload a crossdomain.xml
A crossdomain file indicates the domain(s) you want to give permission to access the content, in your case, this is your website domain. The file looks like this:
<?xml version="1.0"?>
<!DOCTYPE cross-domain-policy SYSTEM "http://www.adobe.com/xml/dtds/cross-domain-policy.dtd">
<cross-domain-policy>
<site-control permitted-cross-domain-policies="all"/>
 <allow-access-from domain="*.miracletutorials.com"/>
</cross-domain-policy>
Where *.miracletutorials.com is the domain we will use to test the HLS adaptive streaming video. You will replace this with your own domain. Copy the example above and open a non-formatting text editor (Notepad.exe for PC, SimpleText for Mac).
Paste the code into the file. Then change the domain name. the *. part guarantees access to all eventual subdomains you may want to use.
When done, safe it as crossdomain.xml (case sensitive).
Go to your bucket in the AWS. Then, click the Upload button. Locate the crossdomain.xml file and upload it there.
When uploaded, click that file in the left hand list because we have to make it public, otherwise, it won’t work.
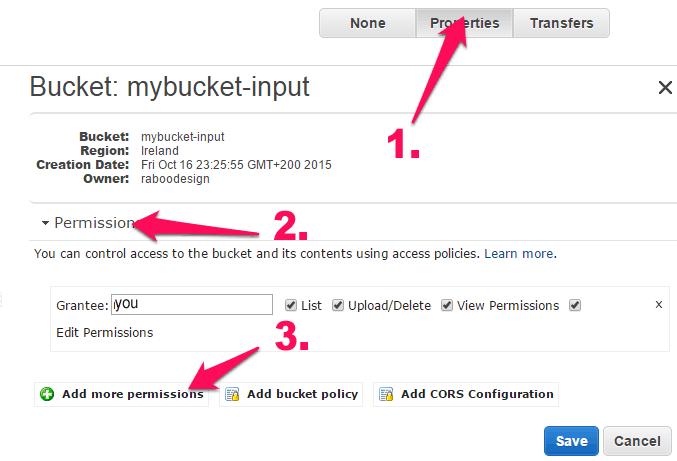
Click the Properties button on the top right:

2. Click on the Permissions link:
This shows the existing permissions. In this example, we see the owner of the account who has all the rights.
We add now a public grantee.
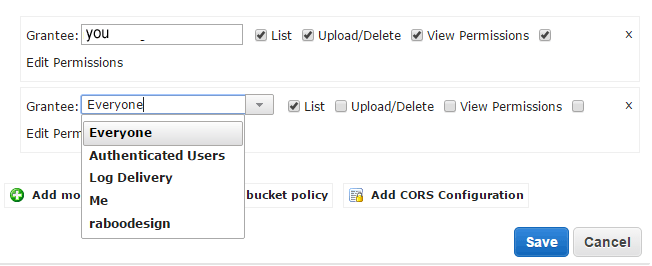
3. Create a new Grantee by clicking Add more permissions link and select Everyone:
Also make sure you only tick the List checkbox, nothing else.
When done, Save.
Now open the folder which contains the video segments (in our example presentations) in the bucket and repeat this process, because we also need the crossdomain.xml file there. In theory, a crossdomain.xml in the root of the bucket should suffice, but occasionally, we had problems when we did not place a crossdomain.xml in folders we wanted to embed videos from, so it cuts out frustration upfront when you follow this strategy.
When done, we have everything in place and we can finally display the video on the site.
View the Embedding an HLS adaptive streaming tutorial to proceed.




Hi there,
I am following your tutorial exactly (using an .mp4) as input but when I click ‘Create New Job’,
I get this error message from the transcoder:
An HLSv3 Playlist must not include Video Only presets in conjunction with presets with Audio. (Service: AmazonElasticTranscoder; Status Code: 400; Error Code: ValidationException; Request ID: 9aabe47c-7f91-11e5-bcbb-45c2b268cf43)
Do you know what’s wrong?
Kind Regards
Hi Jason,
Which preset(s) did you tried to use? Also, did you select the MPEG-2 TS container as the output format (ts)?
Sorry for the delay in getting back to you. It was very kind of you to reply.
I have sorted out that problem now but I noticed that when you talk about the cross domain.xml file, you mention about making it public.
When I go to add permissions to that file, I don’t see the list option. I only see ‘Open/Download’ & ‘View Permissions’
Am I doing something wrong?
No, this is correct. You have to add another grantee, and select “Everyone”, then tick the checkbox Open/Download only (nothing else) and then save.
I know this is very old comment of yours but would have been great if you could have written how you sorted out that problem along with!
Hi Sam,
Are you referring to me or to Jason?
If to me, what problem do you experience?
Hi,
This adaptive streaming plays on browsers and ipads, if we have to do the same on an Android phone how can we do it can you please guide me.
We fallback to the mp4 file on android phone, but its progressive download.
Let me know how we can stream on android.
Thanks,
Vamsi
Hi Vamssi,
Not all versions of Android support HLS. With JW Player 7, this has been improved, though. I tested with a Samsung smartphone using Android 4.2.2 and it works, but JW player does not guarantee it works on all Android devices. There is little you can do about that, I’m afraid.
Rudolf+++
how can i do hls content protection with License Acquisition URL
Hi rastafati,
That is quite complex. You need to write a routine to create an expiring link for each manifest and each segment of the video. You best ask on the AWS forum, because this is beyond the scope of this article.
Rudolf,
Hi there,
I am now getting the “Error loading media: File could not be played”
I have tried testing it on JW Player with their preview. I have my cross-domain files all set to public read and the index file also.
Any help would be great.
Kind Regards
Hi Jason,
Generally, this is a permission problem. But if that is set well, as I think is probably the case with you, another problem might be that the Flash plugin in the browser is not active or outdated.
It is possible to configure HLS adaptive streaming for HTML5 mode but this requires setting CORS headers on the bucket. And in that case you set primary to html5 (primary:’html5′;) instead of flash in the embedding code so that you force html5mode in all circumstances. Disadvantage is that it doesn’t work on IExplorer 11 when the Flash plugin is enabled.
There is a rather unusual workaround for that as explained in a more recent tutorial: https://www.miracletutorials.com/rtmp-hls-aws-1/
If you don’t want to use RTMP as a fallback, you might keep using the embedding code here and add a progressive download mp4 fie as fallback
.Just look follow the procedure of setting the CORS headers in the bucket.
Sorry for the long story. 🙂 Let me know how it goes.
Rudolf+++
Hi Rudolf, Thanks so much for getting back to me.
I have isolated the problem to something in CloudFront, I think.
I can stream mp4 files with a signed URL through CloudFront. They work fine in Safari on OSX.
However, I cannot get HLS to play.
If I go into CloudFront and change the behaviour on the distribution so that ‘Restrict Viewer Access’ is set to ‘No’, then HLS works fine. Basically, it seems the problem is that signed urls won’t work with the index.m3u8 file.
I am at a loss as to what could be wrong here.
Any ideas would be greatly appreciated.
here is my cross-domain.xml file.
.jwpcdn is to allow JWPlayer.
Sorry, but the form you set wouldn’t let me post xml.
No problem, Jason.
Calling the manifest with a signed URL does work, but that manifest is basically a list with static links to various other manifests without signed URLs. And it is there that things go wrong because if you set Restrict Viewer Access to Yes, all files served via your web distribution are regarded as private (even if they aren’t). However, if you permit me to contact you via e-mail in a few days, I can have a look into your situation.
That would be great, thanks.
Hey Rudolf, Great post, I have a couple of these set up (with full workflows in AWS to ingest files and push through Elastic Transcoder). I have a few questions though – it seems most of my customer’s issues are with CORS/cross domain problems. I feel like I’m missing something in AWS – Elastic Transcoder, S3 or Cloudfront that is causing some of these issues (it’s only for some people, not all – but enough to make me realize there might be a problem). I’d love to know if you’re open to looking at our setup to see if you notice anything right off the bat. One step I realize my workflow misses is the “Add Permissions” step in Elastic Transcoder (“Click the +Add Permission link…” section). I’m worried because I have 100 videos in one setup and literally 1,000’s in another and if ALL their permissions are screwed up, well… you see why I need your help! Please email me if you’re open to helping me. I’m desperate, thank you!
Hi Matt,
Yes, I’ll have a look. I’ll send you an e-mail later today so that you can send me the details in private.
how can i do this from ffmpeg please ? I just set up the cloudfront to the output directory from ffmpeg but it caches my .ts and m3u8 which is not what i want …
I’m using ffmpeg to create the stream.
Hi Razvan,
Alas, I’m not acquainted with ffmpeg. I use Elastic Transcoder as it is very convenient and fast.
very helpful I was looking for such settings for my jw8player