
Via Vimeo you can create a Montage widget displaying thumbnails of your videos on your site. This replaces the old Badge widget, which did more or less the same thing. When the visitor clicks on a thumbnail, it redirects to the video on Vimeo. This is different from the Hubnut, which is a fancy playlist feature which keep visitors on your site (See: How to embed the Vimeo’s Hubnut widget).
The montage widget is useful if you want a clean representation of your videos from your channel, group, uploaded videos or your profile videos. It is very easy to implement and it looks nice and clean.
How to embed a Montage widget
Log into your Vimeo account, then go to https://vimeo.com/tools/widget/montage. There you will find a panel with the following options:
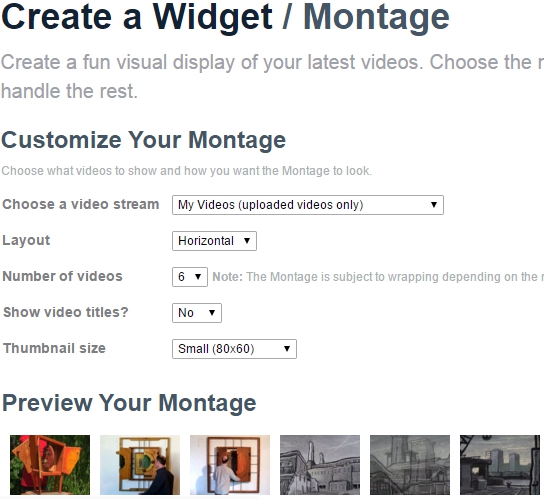
The first option, Choose a video stream, let’s you select which group of videos you want to show. There are 7 ways to do this:
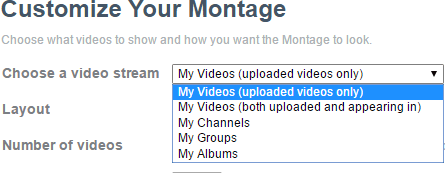
- My videos(uploaded only) are all the uploaded videos on your account. It’s not clear to me what the difference is between the two options of My videos. Perhaps the second version shows any videos, even those not uploaded by you?
- My Channels will show all videos in one of your own channels.
- My Groups show all videos in the group you created. This usually displays videos from all members of the group.
- My Albums is a set of videos you selected on Vimeo and placed under one folder (album). These can be videos from other Vimeo members, eventually mixed with your own.
In this example, I’m going to select one of my channels. As soon as you select My Channels, a new dropdown list shows under the Choose a video stream list:
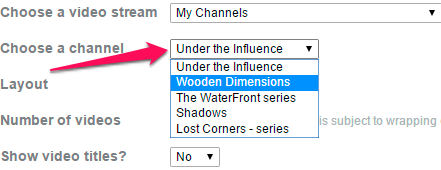
When you select your channel, the Preview updates in real-time, showing you the videos in your channel:

As you can see here, the thumbnails are quite small, but we will tweak this as we go about setting the other options.
The Layout option arranges the thumbnails either Horizontal or Vertical. Horizontal is useful if you embed the montage widget in the content area of an article/post, whereas Vertical is useful if you want to display video thumbnails in a sidebar, for example.
In this example we are going to use the Horizontal setting, which is standard set already.
Then we determine the Number of videos. This is limited to maximum 9. Currently, I have only 5 videos in my channel, but to anticipate for additional videos in the future, I’m going to set it to the maximum. Thus we get this:

If I later on add videos to this channel, they will automatically appear in the montage.
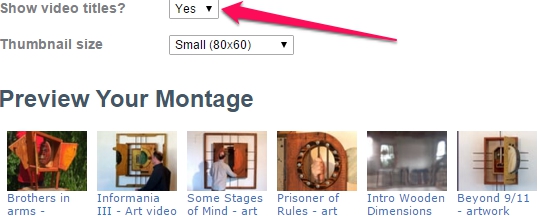
You can also Show video titles, it looks like this:
Finally, we set the Thumbnail size. The maximum size is 200×150 pixels.
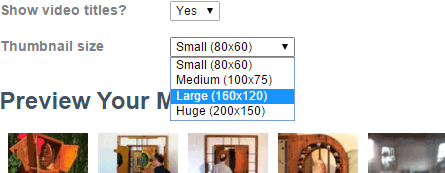
In this example, we select 160×120. This size is more suitable on my site, but you may want to experiment with this a little. With the current settings, it would look like this:

When you are happy with the result, it is time to embed the code into your site.
Placing the Vimeo Montage on your site
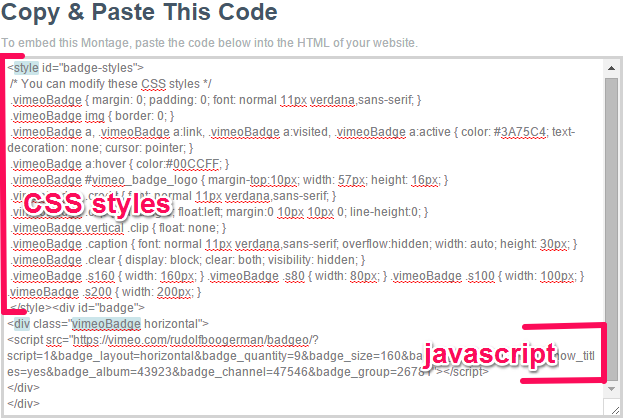
In the Montage panel, scroll down to where you see Copy & paste this code. Here you will find the code to display the thumbnails on your page. It consists CSS styling and JavaScript:
If you are a web developer, you can tweak the code to suit it to your needs, otherwise, just select all the code and copy it as is.
Now, unlike the Hubnut and Single video embedding of Vimeo videos, there is no easy way to place CSS and Javascript into WordPress or Joomla just like that, because a part of it will be stripped as soon as you save your page.
So, the only straightforward way to implement this is by creating html page and call it via an iframe in your post or page. The method we show below is useful for any site type, although for Joomla, you need to work with a wrapper module to call the html page, but we will explain that further up.
Use a html editor or plain text editor like Notepad.exe (Windows) or Simple Text (Mac) and write the following:
<!DOCTYPE HTML PUBLIC "-//W3C//DTD HTML 4.01 Transitional//EN">
<html>
 <head>
 <meta http-equiv="content-type" content="text/html; charset=utf-8">
 <title>My Vimeo Montage</title>
 </head>
 <body>
 </body>
</html>
The code above may have to vary depending where you are located and the language of your site.
Then, using a lazy method, paste the Montage code, like this in between the body tags:
<!DOCTYPE HTML PUBLIC "-//W3C//DTD HTML 4.01 Transitional//EN">
<html>
 <head>
 <meta http-equiv="content-type" content="text/html; charset=utf-8">
 <title>My Vimeo Montage</title>
 </head>
 <body>
<style id="badge-styles">
 /* You can modify these CSS styles */
 .vimeoBadge { margin: 0; padding: 0; font: normal 11px verdana,sans-serif; }
 .vimeoBadge img { border: 0; }
 .vimeoBadge a, .vimeoBadge a:link, .vimeoBadge a:visited, .vimeoBadge a:active { color: #3A75C4; text-decoration: none; cursor: pointer; }
 .vimeoBadge a:hover { color:#00CCFF; }
 .vimeoBadge #vimeo_badge_logo { margin-top:10px; width: 57px; height: 16px; }
 .vimeoBadge .credit { font: normal 11px verdana,sans-serif; }
 .vimeoBadge .clip { padding:0; float:left; margin:0 10px 10px 0; line-height:0; }
 .vimeoBadge.vertical .clip { float: none; }
 .vimeoBadge .caption { font: normal 11px verdana,sans-serif; overflow:hidden; width: auto; height: 30px; }
 .vimeoBadge .clear { display: block; clear: both; visibility: hidden; }
 .vimeoBadge .s160 { width: 160px; } .vimeoBadge .s80 { width: 80px; } .vimeoBadge .s100 { width: 100px; } .vimeoBadge .s200 { width: 200px; }
 </style><div id="badge">
<div class="vimeoBadge horizontal">
<script src="https://vimeo.com/rudolfboogerman/badgeo/?script=1&badge_layout=horizontal&badge_quantity=9&badge_size=160&badge_stream=channel&show_titles=yes&badge_album=43923&badge_channel=47546&badge_group=26781"></script>
</div>
</div>
 </body>
</html>
I said, lazy method, because the proper one is to separate CSS from body content by placing the CSS styles in a separate stylesheet. But since this is a tutorial for beginners, we won’t delve into this now.
If you want to know how to do this, leave a comment at the bottom of the page and I’ll explain.
Save the html page you just created (for example montage.html) and link to it in your website. With PHP, you can also create a page just with the Montage code, and save it for example, as montage.inc, then in your PHP page, write to following at the spot where you want to Hubnut to appear:
<?php include("montage.inc"); ?>
However, the latter method will not work on WordPress or Joomla, unless you use a separate extension/plugin that enables inline PHP code. Presuming you do not want to do this, we will show you how doing it for each one of them.
Calling the Vimeo Montage HTML page in WordPress:
Go to a page or post and add the following code where you want the Montage to appear:
<iframe src="montage.html" width="100%" height="300" frameborder="0"></iframe>
You may have the tweak the height, depending on your situation.
Calling the Vimeo Montage HTLM page in Joomla
Create a wrapper module by going to Extensions > Modules in the admin section of Joomla. Then click the New button and select the Wrapper module.
In the module options, type the name or the full path to the html page:
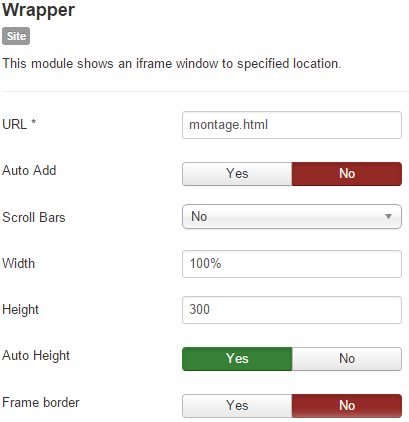
Also fill in the width and height. Then select a position if you want to show the Hubnut in other places that the article content space. When you are ready, save the module and have a look at the front end.
If you want it to show in an article, create a non existing position by typing it in the Position field, for example montage.
Then go to your article and write the following in the editor: {loadposition montage}.
This will show the Hubnut in your article. Save and have a look at the front-end.
Does is look good? Congratulations, you are good to go!
Demonstration Vimeo Montage on WordPress
Below you find the end result of what we did in this tutorial. We created an html page called montage.html and called it within a frame on this page:
The code I placed in the post is this:
<iframe src="https://www.miracletutorials.com/montage.html"
width="100%" height="330" frameborder="0"></iframe>
Depending on the size of your browser, a scroll bar will show on the right hand side. The ideal is to set the height of the iframe in such a way that if the page is viewed full screen, no scroll bar shows. So, I gave it a height of 330 pixels.
It is possible to disable scroll bars altogether, but this is not a good idea, especially not with mobiles in mind, which have small displays. If you were to do that, thumbnails may be cut off or hidden completely. Sure, you can tweak CSS styles, but that is advanced stuff for web developers which do not need my advice on this. 🙂
Be sure to check out our tutorials on the Hubnut and single video embedding.