 Revised on June 2015 – JW Player 5.6 (up to version 5.10) is a Flash video/audio player created with Adobe Flex which has the capability to switch to HTML5 fallback mode if a non Flash browser is encountered. In this tutorial I’m going to show you how to install JW Player and how to embed video and audio from S3 Amazon/CloudFront, making sure the media will play in most circumstances.
If you do not know what S3 Amazon/CloudFront is, please have a look here first because it is currently one of the most important and affordable rich media storage solutions: S3 Amazon and video: introduction Another reason to use S3 Amazon is that RTMP streaming is really easy to implement. All it takes is one line of code.
This is what we are going to do here:
- Install JW player
- Preparing the S3 bucket for streaming and upload your video/audio
- Linking JW Player’s javacript file in the page header
- Embed a streaming video in a html site or WordPress
- Embed a streaming audio in a html site or WordPress
- Embedding more then one audio or video on the same page
- Add a poster image to video
But first we need to create a format of video that is acceptable for most devices. For this, I refer to the previous tutorial:How to encode a video simultaneously for web, iPhone, iPad, iPod & other handheld devices using HandBrake For audio, you can use either MP3 or M4a. In this tutorial we are going to use MP3. Just be aware that MP3 cannot be used for private streaming on S3 Amazon CloudFront. In that case, best use M4a which is widely supported as well.
Install JW player
If you have no copy of JW Player 5.10, note that it is no longer available. In that case, this tutorial is not for you.
If you have a copy and it is a zip file, you have to extract it first. On Windows, right click on the zip file and select Extract. On Mac, simply double click the file and it will extract automatically. If all goes well, you should now have a folder called mediaplayer-5.6. The name of this folder may vary in time. Now do the following:
- Connect to your site with a FTP application. For this you can use the free open source application FileZilla. If you do not know how to work with a FTP application, view this video tutorial: Installing FileZilla (FTP application) & upload WordPress template
- Create a folder called mediaplayer in the root of your domain, so that you get something like this: www.yourdomain.com/mediaplayer/
- Open the folder mediaplayer-5.6 on your local computer and transfer the following files to the mediaplayer folder in your domain:
- jwplayer.js
- player.swf
- No other files are needed. Once uploaded, you are done with FTP, so you can close the FTP application
JW player is installed now. We are ready to embed our media.
Preparing the S3 bucket for streaming and upload your video/audio
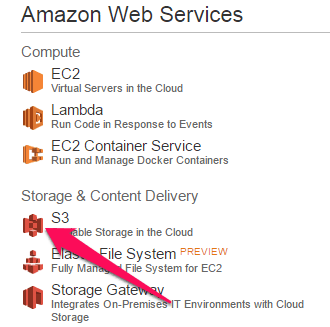
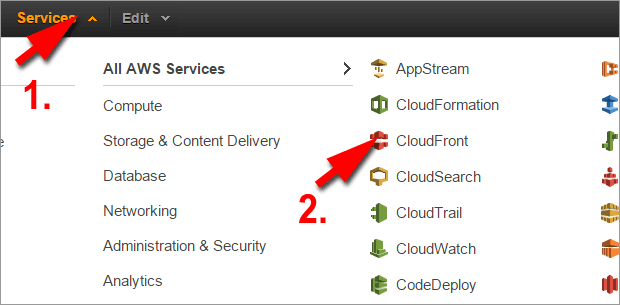
I presume you have already a S3 account with CloudFront. If not, you can read the articles in the category S3 Amazon/Cloudfront to learn more about the service and how to create an account. Do the following: Sign in to the AWS Management Console.
Then select S3 from the service list:
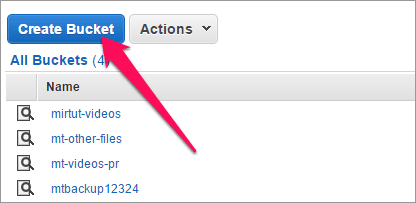
Make sure the tab S3 is selected. Click on the button Create Bucket:
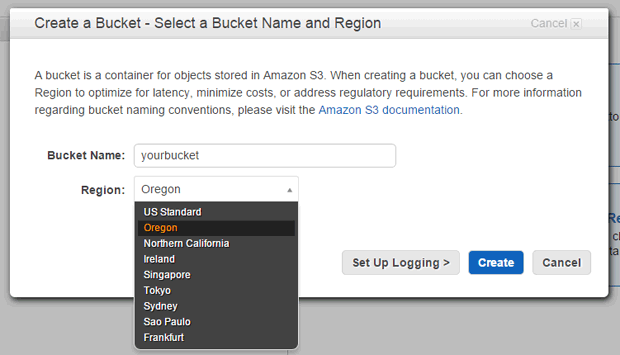
Then you get a dialog box. Fill in the Bucket Name. The name does not matter as long as the name is unique across the S3 Amazon network and you do not use special characters or spaces.
Then select a Region.
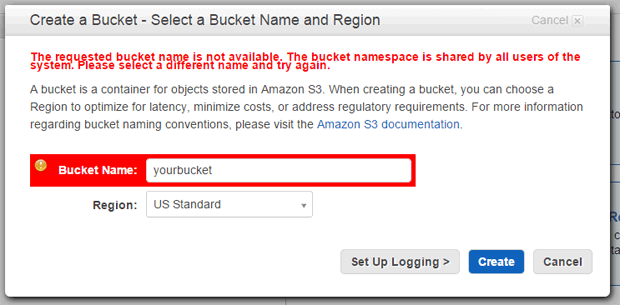
This region should be close to your target audience although it doesn’t really matter because we are going to use the CloudFront service anyway. CloudFront distributes the media over all the servers Worldwide when applicable. Click the Create button. If you get an error message, the name is already taken:
In this situation, find another name that is unique. When your bucket is accepted, select CloudFront from the services:
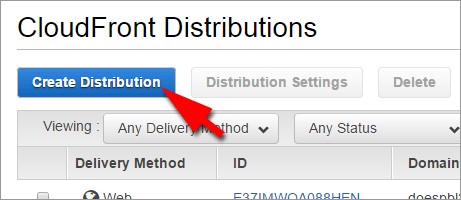
Then click on Create Distribution:
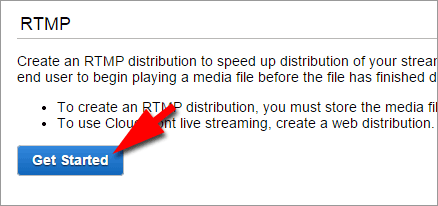
A new dialog box appears with the option to create either a web or RTMP distribution. Select RTMP:
In the next screen, select the bucket you just created by clicking in the field of Origin Domain Name:
We leave Restrict Bucket Access and Restrict Viewer access alone because we want public streaming videos.
But make sure Use All Edge Locations is selected:
CNAMEs is optional, it can be used to mask the name of the URL. This is beyond the scope of this tutorial, so I suggest to leave it empty for now. You can turn Logging on if you want to check the usage of your media but for this exercise, we leave it off.
Comment is useful to identify later on for what purpose you made this distribution. Keep it short.
Finally, make sure Distribution Status is Enabled. Click the con Create Distribution button at the bottom right.
After this, you get a list with your distribution(s). As youcan see, the Status is In Progress:
This will take about 20 minutes to implement, so the distribution is not available yet.
As long as it says In Progress, the distribution is not ready. When finished, the Status changes into Deployed. Once deployed, we can upload our video and/or audio into the bucket, but first we have to make sure the bucket is set to public because we are going to use the public streaming method. In the AWS console, click on the S3 tab again to get to the bucket list:
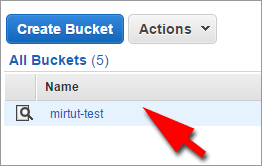
Then click the bucket (in my case mirtut-test):
Then, click on the button Properties on the top right of the main window:
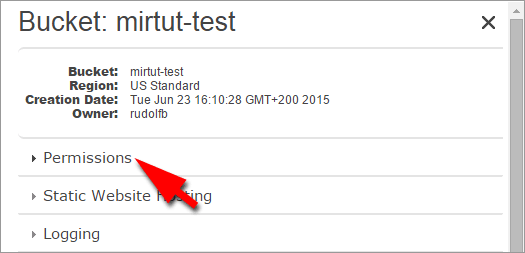
The console now loads the properties of the bucket. Here you select Permissions:
As you can see here, only the Grantee (you) has the permissions to view/work with this bucket, which means the bucket is private. We are going to set it public in order to make the videos available for our site:
It is also possible to set videos public individually once they are uploaded but this is a quicker way:
Click the Add more permissions button. This adds a new Grantee to the list. Click the Grantee dropdown and select Everyone;
Then check the List checkbox. Leave the rest empty:
Then click Save. Click now again on the bucket on the left:
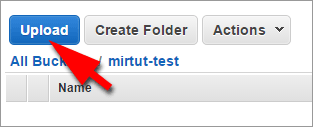
Then you see at the top left a button called Upload. Click it to upload a video:
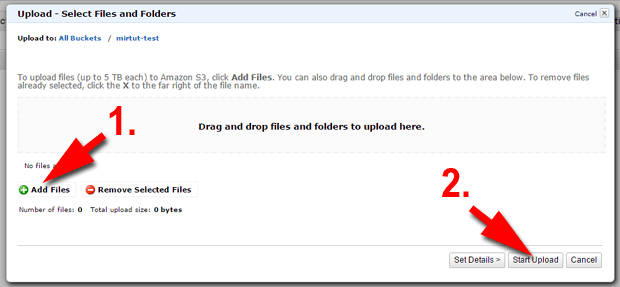
Then do the following:
1. Click the Add Files link and locate the video you want to upload.
2. Click the Start Upload button.
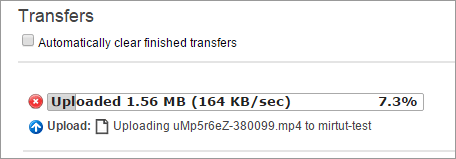
The video will be uploaded to AWS. This may take a while. You see a progress bar while the upload continues:
When it is uploaded, you will see it listed on the left hand side.
Click the video name and click then Properties on the right hand side:
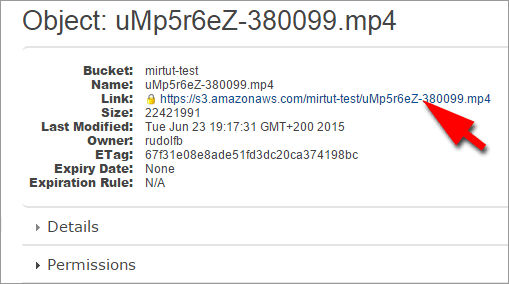
In principal, you can use the link to embed it in your player, but for streaming video, we only need the name of the video. What we need to do now is to make the video public. Repeat the same process of making the bucket public by opening the Permissions link, then select Add more permissions, then select Everyone as the Grantee and check the List checkbox. Then Save.
We are finally ready to embed this video into your website.
Embed a streaming video in a html site or WordPress
There are 5 pieces of information we need to have before we can embed a video:
- Width of the video
- Height of the video
- Name of the video
- Name of the bucket
- Name of the streaming distribution
Width and height is something you probably know already. If not, you may want to open the video on your local computer with QuickTime™ and and open the Movie inspector, which displays all the information on your video. Open a simple text document and write down the width, height and name of the video. It is important not to use a rich text editor because of the formatting. For Windows, use Notepad, for Mac Simple Text.
You can find the name of the bucket and the streaming distribution in one go via the CloudFront service:
Copy the full Domain Name(streaming distribution) and paste it in your text document. You will need it later. Do the same thing with the Origin (bucket). The resulting names will be different in your case, of course. You should have now something like this in your text document:
width: 600 height: 400 name: Intro-Wooden-Dimensions-Project.mp4
streaming distribution: s2eutrkcp9hgwp.cloudfront.net
bucket name: mirtut-test.s3.amazon.com
We need something else too: the path the JW player. Remember you had to upload the files of JW player into the folder mediaplayer on your domain? We need that location now, starting with http:// If your domain is called www.yourdomain.com and you did place the folder mediaplayer in its public folder, then the full path to the player is: http://www.yourdomain.com/mediaplayer/player.swf Add this into your text document.
Now copy this path and change the last part into jwplayer.js, like this: http://www.yourdomain.com/mediaplayer/player.swf becomes http://www.yourdomain.com/mediaplayer/jwplayer.js
The .swf is the player itself which will play your videos onyour site, while the .js is a javascript file that handles the HTML5 fallback and much more. Your text document should look something like this now:
width: 600 height: 400
name: Intro-Wooden-Dimensions-Project.mp4
streaming distribution: s2eutrkcp9hgwp.cloudfront.net
player: http://www.yourdomain.com/mediaplayer/player.swf
javascript: http://www.yourdomain.com/mediaplayer/jwplayer.js
This is all the info we need to embed the video successfully. Now we get to the hairy part of the tutorial. But fear not, we are going to keep this as simple as possible!
Linking JW Player’s javacript file in the page header
The jwplayer.js contains information that our embedding code will need to work properly. Therefore, we have to link to that file, preferably in the header of our page.
The header of a page contains the information to successfully display the content in the body of a html page. CMS like WordPress, Joomla, Drupal, etc,… have page headers too. In fact, they have very complicated headers, but you do not need to worry, we are going to use a little trick to make sure you do not get lost in there if you happen to work with one of them.
But first we need to adapt the following line of code, which we are going to place in the header:
<script type='text/javascript' src='http://www.yourdomain.com/mediaplayer/jwplayer.js'></script>
Change the red part in that line of code to reflect the location of the jwplayer.js on your site. Since you wrote that path down in your text document, this is easy.
When you have done that, copy this line of code again.
Now open the html page with a html editor. If you work with WordPress, you best follow this tutorial: Linking-a-script-in-WordPress-theme.pdf.
For regular html pages, do the following:
- Locate the end tag of title, namely </title> somewhere in the top part of the page in the head section. You will only see this with a HTML editor, visual editors hide this sort of information. If you can’t find it immediately, use the search function, which generally is Control + F for Windows or Command + F for Mac.
- When found, place the cursor directly after the </title> end tag and press ENTER to create a new line.
- Paste the following line on the empty line: <script type=’text/javascript’ src=‘http://www.yourdomain.com/mediaplayer/jwplayer.js‘></script>
You should have something like this now:
other stuff...
<title>My HTML page</title>
<script type='text/javascript' src='http://www.yourdomain.com/mediaplayer/jwplayer.js'></script>
other stuff...
Save the page. That’s it. We are done with the preparations.
Embed a streaming video in a html site or WordPress
When you’ve added the link to the javascript file in the header of your page, we are ready to move on and embed the video.
Consider this piece of daunting code below:
<div id="container1"  >Loading video...</div>
          <script type="text/javascript">
              jwplayer('container1').setup(
              {
                  'id': 'container1',
                  'wmode': 'transparent',
                  'icons': 'true',
                  'allowscriptaccess': 'always',
                  'allownetworking': 'all',
                  'file': 'myvideo.mp4',
                  'width': '500', 'height': '307',
                  'controlbar': 'bottom',
                  'dock': 'false',
                  'provider':'rtmp',
                  'streamer':'rtmp://xxxxxxxx.cloudfront.net/cfx/st',
                  'modes': [
                      {type: 'flash', src: 'http://www.yourdomain.com/mediaplayer/player.swf'},
                      {
                        type: 'html5',
                        config: {
                         'file': 'http://mybucket.s3.amazonaws.com/myvideo.mp4',
                         'provider': 'video'
                        }
                      },
                      {
                        type: 'download',
                        config: {
                         'file': 'http://mybucket.s3.amazonaws.com/myvideo.mp4',
                         'provider': 'video'
                        }
                      }
                  ]
              });
          </script>
Looks like a mess, doesn’t it? Luckily, you do not need to understand most of it, just copy and paste and then adapt the parts in red. We go over this one by one. For now, please copy everything in green (including the red parts) and paste it in your text document. Further below, we need to change the file name of your video:
'file': 'myvideo.mp4',
Again adapt only the red part. If by any change you created a folder in your bucket and placed the video there, you need to add the name of that folder also, like this:
'file': 'myfolder/myvideo.mp4',
Directly below that line of code, you see width and height. Change the red parts according to the dimension of your video. But wait: the height needs to allow for the control bar too. So, add 20 pixels to the height. For instance, if height is 400, make it 420, like this:
'width': '600', 'height': '420',
Now we need to tell the player where the RTMP streamer software is:
'streamer':'rtmp://xxxxxxxx.cloudfront.net/cfx/st',
The streamer software can be found in your streaming distribution. It is as simple as that. Just exchange the red part with your distribution. Let’s say, your distribution is s3advzb3o45ezk.cloudfront.net, then it becomes:
'streamer':'rtmp://s3advzb3o45ezk.cloudfront.net/cfx/st',
Now we come to the heart of the matter, where we make sure our video plays in most circumstances, namely the modes. There are 3 possible modes and we are going to use them all:
- Flash
- HTML5
- Download
If a Flash capable browser is found, we use the Flash mode. If a non Flash browser is found which supports HTML5, like iPhone, iPad etc.., use HTML5 mode. If a non Flash browser is found without HTML5 capability, switch to download mode. This last mode is used primarily by regular mobiles. As such, you cover a wide range of devices. Back to our code now. For the Flash mode, we need to provide the path to the player.swf.
'modes': [
         {type: 'flash', src: 'http://www.yourdomain.com/mediaplayer/player.swf'},
Replace the red part with the path to your player. For the HTML5 mode and the download mode, we need to provide the full path to the bucket, plus the name of the video. This ensures that in HTML5 mode, we switch to progressive download because HTML5 cannot handle streaming video:
type: 'html5',
config: {
         'file': 'http://mybucket.s3.amazonaws.com/myvideo.mp4',
         'provider': 'video'
        }
Replace the red part with the path to the bucket, and replace the blue part with the name of the video. If you placed the video in a folder, add that folder as well, like this:
type: 'html5',
config: {
         'file': 'http://mybucket.s3.amazonaws.com/myfolder/myvideo.mp4',
Now copy that full path, because we need to repeat it in the download mode:
type: 'download',
config: {
        'file': 'http://mybucket.s3.amazonaws.com/myvideo.mp4 ',
That’s it! You have done it. You can copy the whole bunch of code again and paste it in your html page for display.
WorPress requirements:
- placing javascript in posts can be problematic, depending on the version. You may need to enclose the code between the code tags <code></code>if it does not work.
- You also need to paste it in HTML mode, not in the Visual editor, this is very important. Otherwise, special characters will be transformed, making the code redundant.
- It is best to add the embedding code in the end when all other eventual content is written in a post or page, because switching back to Visual editor can create problems. I had to redo placing the embedding code several times and the media only showed up when I saved in HTML mode.
Here is the full code again:
 <script type='text/javascript' src='http://www.yourdomain.com/mediaplayer/jwplayer.js'></script>
<div id="container1"  >Loading video...</div>
          <script type="text/javascript">
              jwplayer('container1').setup(
              {
                  'id': 'container1',
                  'wmode': 'transparent',
                  'icons': 'true',
                  'allowscriptaccess': 'always',
                  'allownetworking': 'all',
                  'file': 'myvideo.mp4',
                  'width': '500', 'height': '307',
                  'controlbar': 'bottom',
                  'dock': 'false',
                  'provider':'rtmp',
                  'streamer':'rtmp://xxxxxxxx.cloudfront.net/cfx/st',
                  'modes': [
                      {type: 'flash', src: 'http://www.yourdomain.com/mediaplayer/player.swf'},
                      {
                        type: 'html5',
                        config: {
                         'file': 'http://mybucket.s3.amazonaws.com/myvideo.mp4',
                         'provider': 'video'
                        }
                      },
                      {
                        type: 'download',
                        config: {
                         'file': 'http://mybucket.s3.amazonaws.com/myvideo.mp4',
                         'provider': 'video'
                        }
                      }
                  ]
              });
          </script>
NOTE: Placing this kind of embedding code in Joomla is not possible. The editor will wipe away most of the code, making it useless. You may need to use an extension that allows emabedding javascript code in articles. Drupal won’t have any problems accepting javascript code.
OK, save your page and test it out. Below, you find the result in my situation:
If it does not work for you, there can be various reasons. Either you made a typo in the name of the video, the bucket or the streaming distribution. Or, you may not have copied the full code. Or you wiped away one of the quotes by accident. like ‘file’: myvideo.mp4′ should be ‘file’: ‘myvideo.mp4′
It is sometimes hard to find a mistake. The shortcut is to copy the original code again and replace your local info again. Often this is quicker way then trying to find out where it went wrong. This is why I advice to prepare the code upfront and save it in your text document instead of manipulating it in the page directly.
Embed a streaming audio in a html site or WordPress
When you’ve added the link to the javascript file in the header of your page, we are ready to move on and embed the video.
There are 3 pieces of information we need to have before we can embed an audio:
- Name of the audio
- Name of the bucket
- Name of the streaming distribution
Open a simple text document and write down the name of the audio. It is important not to use a rich text editor because of the formatting. For Windows, use Notepad, for Mac Simple Text. You can find in the name of the bucket in the Objects and Folders window in the AWS Management console. Or you can click on the CloudFront tab to get the streaming distribution name and the bucket name in one go:
Copy the full Domain Name(streaming distribution) in the CloudFront Distributions window and paste it in your text document. You will need it later.
Do the same thing with the Origin (bucket). Names will be different in your case, of course. You should have now something like this in your text document:
name: audiotest.mp3
streaming distribution: s2eutrkcp9hgwp.cloudfront.net
bucket name: mirtut-test.s3.amazon.com
We need something else too: the path the JW player. Remember you had to upload the files of JW player into the folder mediaplayer on your domain? We need that location now, starting with http://
If your domain is called www.yourdomain.com and you did place the folder mediaplayer in its public folder, then the full path to the player is: http://www.yourdomain.com/mediaplayer/player.swf
Add this into your text document. Now copy this path and change the last part into jwplayer.js, like this:
http://www.yourdomain.com/mediaplayer/player.swf becomes http://www.yourdomain.com/mediaplayer/jwplayer.js
The .swf is the player itself which will play your videos onyour site, while the .js is a javascript file that handles the HTML5 fallback and much more. Your text document should look something like this now:
name: audiotest.mp3
streaming distribution: s2eutrkcp9hgwp.cloudfront.net
bucket name: mirtut-test.s3.amazon.com
player: http://www.yourdomain.com/mediaplayer/player.swf
javascript: http://www.yourdomain.com/mediaplayer/jwplayer.js
This is all the info we need to embed the audio successfully. Now we get to the hairy part of the tutorial. Look at this this piece of complicated code below:
<div id="container1"  >Loading audio...</div>
          <script type="text/javascript">
              jwplayer('container1').setup(
              {
                  'id': 'container1',
                  'wmode': 'transparent',
                  'icons': 'true',
                  'allowscriptaccess': 'always',
                  'allownetworking': 'all',
                  'file': 'myvideo.mp4',
                  'width': '500', 'height': '24',
                  'controlbar': 'bottom',
                  'dock': 'false',
                  'provider':'rtmp',
                  'streamer':'rtmp://xxxxxxxx.cloudfront.net/cfx/st',
                  'modes': [
                      {type: 'flash', src: 'http://www.yourdomain.com/mediaplayer/player.swf'},
                      {
                        type: 'html5',
                        config: {
                         'file': 'http://mybucket.s3.amazonaws.com/myvideo.mp4',
                         'provider': 'sound'
                        }
                      },
                      {
                        type: 'download',
                        config: {
                         'file': 'http://mybucket.s3.amazonaws.com/myvideo.mp4',
                         'provider': 'sound'
                        }
                      }
                  ]
              });
          </script>
Looks like a mess, doesn’t it? Luckily, you do not need to understand most of it, just copy and paste and then adapt the parts in red. We go over this one by one. For now, please copy everything in green (including the red parts) and paste it in your text document.
For the sharp minds who have already gone over the video example, there is a slight difference between the code for video and audio, namely the provider attribute in HTML5 mode and Download mode. In the video version this is:
'provider': 'video'
For audio this is:
'provider': 'sound'
Therefore, do not copy the video code to use for an audio. Use the sample here instead. OK, let’s move on. The first thing we need to change is the path to the javascript file:
<script type='text/javascript' src='http://www.yourdomain.com/mediaplayer/jwplayer.js'></script>
Copy the full path you saved for javascript and paste it in place of the red part. Leave the rest as is. Further below, we need to change the file name of your audio:
'file': 'myaudio.mp3',
Again adapt only the red part. If by any change you created a folder in your bucket and placed the video there, you need to add the name of that folder also, like this:
'file': 'myfolder/myaudio.mp3 ',
Directly below that, you see width and height. For the height, best set it to 24 pixels, since this is the height of the standard control bar. The width can be set as you like, but never make it wider then your layout (theme) allows you. For instance, height is 24 and width 500, like this:
'width': '500', 'height': '24',
Now we need to tell the player where the RTMP streamer software is since we would like to stream the audio:
'streamer':'rtmp://xxxxxxxx.cloudfront.net/cfx/st',
The streamer software can be found in your streaming distribution. It is as simple as that. Just exchange the red part with your streaming distribution. Let’s say, your distribution is s3advzb3o45ezk.cloudfront.net, then it becomes:
'streamer':'rtmp://s3advzb3o45ezk.cloudfront.net/cfx/st',
Now we come to the heart of the matter, where we make sure our audio plays in most circumstances, namely the modes. As indicated before, there are 3 modes:
- Flash
- HTML5
- Download
If a Flash capable browser is found, we use the Flash mode. If a non Flash browser is found which supports HTML5, like iPhone, iPad etc.., use HTML5 mode. If a non Flash browser is found without HTML5 capability, switch to download mode. This last mode is used primarily by regular mobiles. As such, you cover a wide range of devices. Back to our code now. For the Flash mode, we need to provide the path to the player.swf.
'modes': [
         {type: 'flash', src: 'http://www.yourdomain.com/mediaplayer/player.swf'},
Replace the red part with the path to your player. For the HTML5 mode and the download mode, we need to provide the full path to the bucket, plus the name of the audio. This ensures that in HTML5 mode, we switch to progressive download because HTML5 cannot handle streaming audio:
type: 'html5',
config: {
         'file': 'http://mybucket.s3.amazonaws.com/myaudio.mp3',
         'provider': 'sound'
        }
Replace the red part with the path to the bucket, and replace the blue part with the name of the video. If you placed the video in a folder, add that folder as well, like this:
type: 'html5',
config: {
         'file': 'http://mybucket.s3.amazonaws.com/myfolder/myaudio.mp3',
Now copy that full path, because we need to repeat it in the download mode:
type: 'download',
config: {
        'file': 'http://mybucket.s3.amazonaws.com/myaudio.mp3 ',
That’s it! You have done it. You can copy the corrected code version completely and paste it in your html page for display.
WorPress requirements:
- placing javascript in posts can be problematic, depending on the version. You may need to enclose the code between the code tags <code></code>if it does not work.
- You also need to paste it in HTML mode, not in the Visual editor, this is very important. Otherwise, special characters will be transformed, making the code redundant.
- It is best to add the embedding code in the end when all other eventual content is written in a post or page, because switching back to Visual editor can create problems. I had to redo placing the embedding code several times and the media only showed up when I saved in HTML mode.
 <script type='text/javascript' src='http://www.yourdomain.com/mediaplayer/jwplayer.js'></script>
<div id="container1"  >Loading audio...</div>
          <script type="text/javascript">
              jwplayer('container1').setup(
              {
                  'id': 'container1',
                  'wmode': 'transparent',
                  'icons': 'true',
                  'allowscriptaccess': 'always',
                  'allownetworking': 'all',
                  'file': 'myaudio.mp3',
                  'width': '300', 'height': '20',
                  'controlbar': 'bottom',
                  'dock': 'false',
                  'provider':'rtmp',
                  'streamer':'rtmp:// s3advzb3o45ezk .cloudfront.net/cfx/st',
                  'modes': [
                      {type: 'flash', src: 'http://www.yourdomain.com/mediaplayer/player.swf'},
                      {
                        type: 'html5',
                        config: {
                         'file': 'http://mybucket.s3.amazonaws.com/myaudio.mp3',
                         'provider': 'sound'
                        }
                      },
                      {
                        type: 'download',
                        config: {
                         'file': 'http://mybucket.s3.amazonaws.com/myaudio.mp3',
                         'provider': 'sound'
                        }
                      }
                  ]
              });
          </script>
NOTE: Placing this kind of embedding code in Joomla is not possible. The editor will wipe away most of the code, making it useless. You may need to use an extension that allows embedding javascript code in Joomla articles. Drupal won’t have any problems accepting javascript code.
OK, save your page and test it out.Here you find an example of an audio:
If the code does not work for you, there can be various reasons. Either you made a typo in the name of the audio, the bucket or the streaming distribution. Or, you may not have copied the full code. Or you wiped away one of the quotes by accident. like ‘file’: myaudio.mp3′ should be ‘file’: ‘myaudio.mp3′ It is sometimes hard to find a mistake. The shortcut is to copy the original code again and replace every red part anew. Often this is quicker then trying to find the needle in a haystack.
Embedding more then one audio or video on the same page
When embedding more then one media in the page, we need to change three pieces of the puzzle. Look closely at the top part of our code.
We need to change the id in three places:
<div id="container1">Loading video...</div>
          <script type="text/javascript">
              jwplayer('container1').setup(
              {
                  'id': 'container1',
For the second video or audio this can become:
<div id="container2">Loading video...</div>
          <script type="text/javascript">
              jwplayer('container2').setup(
              {
                  'id': 'container2',
In this way, you can add as many videos and audios as you like. If you forget to make the id unique, the second media with the same id will not show up.
Add a poster image to the video
So far, the video shows up as an empty space with an arrow and control bar. This is not really exciting, so we need to spice it up with a poster image. For this, you can prepare a JPG or PNG with the same dimensions as the video itself (without the control bar height). You can place that image anywhere on your own domain or place it on S3 Amazon. If you place it on S3 Amazon, you need to create a crossdomain.xml file to make sure the Flash player can access the poster image. This xml file needs to be uploaded into the same spot as the poster image so that the player knows it is allowed to use that image.
Read Using crossdomain.xml for subtitles and playlists to learn how to create such a file. Once you uploaded the poster image, we need to insert a new line of code into our existing embedding code:
'image': 'http://www.yourdomain.com/folder/posterimage.jpg',
where the red part needs to be adapted to your situation. This can also be:
'image': 'http://mybucket.s3.amazonaws.com/posterimage.jpg',
or in case you placed it in a download distribution:
'image': 'http://xxxxx.cloudfront.net/posterimage.jpg',
Note the comma after the line of code. It indicated that there is more to follow. If you forget it, the embedding won’t work.
Where to we put this line of exactly? There is actually no rule where to place it within the embedding code, but it is a good idea to place it right after the file attribute, like this:
<div id="container1"  >Loading video...</div>
          <script type="text/javascript">
              jwplayer('container1').setup(
              {
                  'id': 'container1',
                  'wmode': 'transparent',
                  'icons': 'true',
                  'allowscriptaccess': 'always',
                  'allownetworking': 'all',
                  'file': 'myvideo.mp4',
                  'image': 'http://mybucket.s3.amazonaws.com/posterimage.jpg',
                  'width': '500', 'height': '320',
                  'controlbar': 'bottom',
                  'dock': 'false', ...............
In the example below, I used a poster image located in a download distribution to speed up the download of the image:
If your poster image does not show up, then it might have two possible causes: a typo in the image path/name or an error in the crossdomain.xml (if the poster image is located outside the domain where the player is located).
Hopefully, this helps you to setup your videos successfully. In Part 2, we explore dynamic playlists.
What about private streaming?
Private streaming is possible too, but you need a mechanism to create expiring URLs on the fly. For this, you best work with a plugin, especially when working with WordPress or Joomla. You may be interested checking out our solution: S3Media Stream™ for WordPress 3.x or S3Media Stream™ for Joomla 1.5.x It takes all the hard work out of embedding and it creates the expiring, or signed URLs for you. On top of that, it provides a whole host of interesting options.
Client applications to replace the AWS Management console
As said earlier, the console is slow and cumbersome. Luckily there are several excellent applications that can act as a client between your computer and your S3 Amazon/CloudFront account. I tested out many applications and two came out top: CloudBerry S3 Explorer and Cyberduck(Mac). I’m not saying the others are useless, but the pro versions of these two have everything you need.







Nice tutorial. I am trying to do the same stuff with JWPlayer. I need to be able to stream the video on ipad and iphone. But as soon as i add the provider and streamer params, the html5 video stops playing on ipad. Do you know what might be causign that?
Hi Shamaila,
First of all, it is important to understand that you cannot stream video on any html5 capable device because html5 cannot handle that (yet). Therefore, the player needs to switch to progressive download in order to work on iPad/iPhone.
So, no streamer path is allowed in this part:
type: ‘html5’,
config: {
‘file’: ‘https://mybucket.s3.amazonaws.com/myaudio.mp3’,
‘provider’: ‘sound’
It either directly links to the file using the bucket, or by using a download distribution, like:
type: ‘html5’,
config: {
‘file’: ‘https://xxxxxxx.cloudfront.net/myaudio.mp3’,
‘provider’: ‘sound’
You see what I mean? If I misunderstood you, best put the code you used in here and I’ll have a look.
I don’t think Firefox and a few other don’t play .mp4. So you might have to have the files in .ogv and webm. for google chrome in an html5 if no flash present.
Hi Shane, you do not need to worry about regular browsers, they all support Flash and Flash has 98% penetration on the internet. Thus, no problem there.
Regarding HTML5 mode: MP4 is still the most widely used standard. Only Chrome(used on Android devices) does not support it in HTML5 mode.
If you want to make sure that it plays on Android, you do need WebM, yes.
The solution for that is adding a separate download link below the embedding code.
Hi this is great website.
Could you demonstrate how to use RTMP in connection with JW plugin WordPress plugin ?
Hi Mike,
Here is a demo of S3Media Stream for WordPress:
http://www.miracletutorials.nl/streaming-video-with-fallback
It contains several types of audio and video for demonstration purposes.
You, sir, are awesome and just saved my day. Thank you!
It’s a pleasure, Phobop.
Very helpful … can it be done with playlist too?
Hi Robin,
Yes it can. Have a look here: https://www.miracletutorials.com/embedding-playlist-streaming-video-using-jw-player/
setting files as public read in S3 (for cloudfront) is less than ideal
please demonstrate policies to constrain access OTHER-THAN via referer as it is
TRIVIAL TO SPOOF REFERER
Great tutorial and the streaming video works for me. But I can’t get the preview image to work with the image configuration option ‘image’: no matter what path I place afterwards. When I add it in, the video will not load. Any ideas?
Hi Phil,
Did you place the image in S3 Amazon or on your site? If Amazon, check the ACL settings. It should be public. Also, if you placed in it Amazon, you need a crossdomain.xml that gives permission to your site to access files on external servers.
Here is a tutorial for crossdomain.xml: http://www.wp21century.com/using-crossdomain-xml-for-subtitles-and-playlists/
Turned out to be a simple syntax error – the need for a comma at the end of the ‘image’: line. You can tell I’m no coder!
Thanks anyway and once again for a great tutorial; I’ve learned a lot today.
Ah, yes, that happens, even to coders 😉
Thank you for the article. We are using the JWplayer on our site, but we couldn’t create many player’s windows on the one site. The solution with the playlist is working great and cool, but not flexible.
If you insert the code of the common Block SinglePlayer into your site’s code more than 1 times, then the JWplayer is not working.
Could you advise us the possibilities to use the code of the Block SinglePlayer mor than 1 times.
We are using JWPlayer – player.swf and jwplayer.js.
The best solution is the use of the .swf- and .js-files.
Hi Mike,
You need to give a different ID for each player. So, if your first player is called ‘id’: ‘container1’,
then call the next one ‘id’: ‘container2’
In that way you can add a many players as you like, although I would not overdo it.
Hope this helps?
I have been using the cut and paste code that longtail and amazon give out – trying to use multiple players on one page – and I don’t see an ‘id’:’container’ line. Am I missing something? Here is the code I am using (for mp4s) I am using s3 and cloudfront, and can only get one video to play at a time. Any help is appreciated – thanks! I will try your code This is a link to the code I was referencing.
http://aws.amazon.com/articles/4101
Hi Anthony,
That example uses the old embedding code with swfobject.js, I would not use that anymore because it will be phased out. Especially if you want to be html5 compatible, you have to use jwplayer.js instead.
To set several players, you need to make sure that each player has its unique ID. For example: container1, container2, container3
Make sure that all references to the ID in the same player are equal.
Let me know if you need more help.
I used your code which is better and has the container line – and it works. But of course, it won’t display my 16×9 videos correctly! Any code on this?
Yes, you can add ‘stretch’:’uniform’,
If you see black bands, you did not set the relationship between height and width correctly. This may need some tweeking but once you have it right, you can re-use the same dimensions over and over again.
no I got it now. and i found the code for ‘exactfit’ to make it stretch correctly.
the only thing i can’t figure out now is if it’s slower to go through cloudfront or to stream directly off of s3, as I don’t plan on there being lots of traffic. it’s a video database, here is the test link. they load slow, both off of cloudfront and when i go directly from s3
^[link no longer available]
Hi Anthony,
According to the link you gave me, all those videos play from the bucket, no one is playing from the cloudfront distribution. But even then, they do download very slow for such short videos and they stall as well during playback. This indicates your bitrate per second is too high or something is wrong with the information in the header of the video. You may need to compress them using a tool like HandBrake. There is a tutorial for it on the site.
Another option is to use RTMP streaming. For this, you use a streaming distriubtion as explained in this tutorial.
Rudolf
Yes, I was streaming the actual files that are meant for downloading. Way too heavy. I re-exported lo-res versions of the files as previews, and it loads much quicker. The files for downloading are still hi-res.
I am happy with this solution although the work flow will be detailed. Here is the new version
[link no longer available]
The only thing I’d like to do is have each video play for a second then pause (to create a fake poster frame) then resume playing on rollover or hitting play.
Thanks for your input.
You can set start and duration as well:
‘start’:’00:10′,
‘duration’:’00:40′,
This means the video start at 10 seconds from the beginning and will stop at the 40 seconds mark.
Rollover is a difficult issue because you do not know whether Flash has still focus at that point or not, so any reliable solution should be outside the player.
using mp4s, but same point. I will try the start code which may be the easiest. thanks!
Hi
I was wondering how to use the code when the files are not hosted on S3 Amazon, but all stored locally.
The code above doesn’t work on iPad when not using rtmp protocol
Thanks
Hi Klendo,
Then you need to change the path to the rtmp software (‘streamer’:….). This will depend on the software you use, but usually, the most affordable application is Adobe Flash Server (although still quite expensive and difficult to configure), which you install on your server.
When you do not use rtmp, you need to adapt the code. “provider’: ‘rtmp’ becomes then ‘provider:’video’ and you need to drop the streamer attribute altogether. Also set the ‘file’ attribute to an absolute path or relative from the page on display.
I can give you an example if you like.
Hi, everything sounds nice and easy, but your page : https://www.miracletutorials.nl/streaming-video-with-fallback
doesn’t play on iphone4S.
Am i missing something about iphone/ipad. I cannot get any video from my S3 cloudfront to play on thoses device. I optimized the video with handbrake, made different resolution , H.264 or FFmpeg codec … Nothing.
It plays good on Android, Firefox, safari …
And I don’t find any answer on the internet..
Maybe you have a tip to give me about playing mp4 video from S3 cloudfront on iphone/ipad ….
Niko
Sorry, I missed this question. Could you show us a page, Niko? As Diane says, it might be a little error in the script.
Niko, sounds like something’s wrong with the HTML5 part of the script. Maybe an error with your bucket name? Double check all the punctuation in that part of the script too.
Great tutorial Rudolf.
Unfortunately, JW Player requires a $99/yr license (per site) in order to use it for any kind of commercial or promotional purposes.
Do you know of any free solutions that allow RTMP streaming with HTML5 fallback?
Hi Vic, yes you can try FlowPlayer from https://flowplayer.org. It’s actually quite good.
But if you want to remove the watermark, you need to buy a license.
I’ve completed the tutorial (nice work by the way) but I’ve hit a snag.
I get “Error loading Media:File could not be played”.
If I move the video file to my local server it plays fine. So basically its looking at the wrong source.
Do you have any idea why my code would be looking at the local folder instead of the bucket?
[link no longer available]
Thanks, Alan
Hi Alan,
This is because you are using JW player 6.0. The tutorial is meant for version 5.6 to 5.10
Here is how you should set it up for JW player 6.0 (with html5 fallback):
jwplayer(“myElement”).setup({
playlist: [{
image: “myVideo.jpg”,
sources: [{
file: “rtmp://s4regmn755rvt.cloudfront.net/cfx/st/mp4:/video.mp4”
},{
file: “https://moviemasher3xm.s3.amazonaws.com/video.mp4”
}]
}],
height: 307,
primary: “flash”,
width: 500
});
Note that a couple of features have changed. Have a look at this report:
https://www.miracletutorials.com/should-i-upgrade-to-jw-player-pro-6-0-or-premium/
I hope that helps?
Thanks for the reply. Unfortunately no video is showing at all now.
[link no longer available]
Never mind, I think I sorted it.
Thanks!
Hi Andy, The problem is in the quotes. You were using single quotes in your embedding code. While the older version was lenient in this respect, JW player 6.0 is not.
So, the correct format is:
jwplayer(“container1”).setup({
playlist: [{
sources: [{
file: “rtmp://sxxxxxxxxxx.cloudfront.net/cfx/st/mp4:video.mp4”
},{
file: “https://xxxxxxxx.s3.amazonaws.com/video.mp4”
}]
}],
height: 360,
primary: “flash”,
width: 640
});
Hello,
I’m wondering what it would take for me to be able to make a custom audio streaming player for my internet radio station in html 5. I DJ online and would like to make a player for my little site that is not flash.
Thank You,
Jeremy
Hi Jeremy,
The problem is, html5 cannot stream audio nor video. You need RTMP software which requires Flash, Flex or Air.
So, if streaming is important to you, you need a Flash player with html5 fallback. Both FlowPlayer and JW player have strong capabilities to support streaming audio with html5 fallback.
Both have a free version of their player and you can make custom skins for the player.
For progressive download audio, there is a free simple html5 player which you can adapt to your needs: http://kolber.github.io/audiojs/
Here is also another html5 player with lots of options: https://jplayer.org/latest/demos/ It also has streaming capabilities but this is quite advanced.
Here is another one with a thumbnails and playlists: http://www.codebasehero.com/files/music-player/demo/
Great article ! Would you be able to guide me if i could tweak the same for live streaming. Just couldn’t figure a way out without some professional service provider .
It would be great if u could find a way out with obs project or even wirecast.
( Also reviewing azure sometime would be nice too.)
looking forward ,
regards.
Hi Starr, I haven’t tested live streaming myself, but I’m sure support of JW Player can help you out there.
Hi Rudolf, Great tutorial! I am having difficulties with mp4 video via RTMP (CloudFront) on JW player 6. Somehow the forwarding in the timeline doesn’t work. Wherever I place the time pointer, it jumps back to where the video has loaded so far. It should work with RTMP and Flash, right? IT works in HTML5 fall back, but not with RTMP distribution.
see: https://dharmasun.org (at the bottom: handpicked talks)
Hi Mike,
Yes, it should work in both modes. At first sight, it looks like progressive download plays first, therefore, no rtmp streaming takes place.
When I look into the source code, I see that the links to rtmp are incomplete. But I’m on vacation now, I can look deeper into it when I’m back on the 28th September.
Thanks for the first reply, looking forward to receiving more of your valuable analysis and tips!
Hi Rudolf,
Whenever you find a few minutes to look into our issue with the timeline forwarding, this will be very helpful! Thanks, Mike
Sorry for the late repsonse, Mike. I forgot.
The rtmp link is incorrect because you are using JW Player 7.5, which requires another approach.
For instance, …/cfx/st/dharmasun/mp4:en/int/intro_suffering_happiness_01_Chokyi_Nyima_Rinpoche_HD.mp4
should be:
…/cfx/st/dharmasun/_definst_/mp4:en/int/intro_suffering_happiness_01_Chokyi_Nyima_Rinpoche_HD.mp4
Also, if you want to play streaming video first, you have to set it before the progressive download links. All your videos have the progressive download videos set first.
Let me know if this helps.