With HTML5 you can embed a video without the need to install a player. This tutorial explains how to embed a video starting with a simple example, to end with multilingual subtitles and advanced options. You will be able to use the embedding code below in practically any cms or html website. Content management systems like Joomla, WordPress or Drupal have plugins/extensions which take care of the code for you, but you may want to include features that are not available and it is fun to work with once you know the basics.
As said, we start with a simple video embedding, ending with advanced features you certainly want to know about. To begin with, which video formats are supported:
Which video format to use for HTML5 embedding?
There are currently 3 video formats that cover together all modern browsers (Chrome, Firefox, Safari, Opera, Iexplorer, Edge,..). Here they are in order of importance; mp4, webm, ogg. Ogg, also called ogv, is not ideal since the compression method is not as efficient as mp4 and webm but if you want to cover older web browser, you may want to include it.
What about audios? Soon, we publish a tutorial on that.
Converting a video to mp4, webm, ogg
If your video is in another format, like mov, flv, etc. and you don’t have a video converter, you can use an online converter, or the free application HandBrake (Mac & PC) or Elastic Transcoder from AWS(if you have an account).
There are numerous other options out there, of course.
A (very) simple HTML5 video embedding
Below is a simple video embedding with the minimum of required attributes. This is quite straightforward in comparison with older embedding methods:
<video controls width="100%" src="https://mydomain.com/myvideo.mp4"></video>
In the first line of code, we indicate the type of media, namely video:
<video controls width="100%" src="https://mydomain.com/myvideopossibilities to download the video.mp4">
</video>
All other attributes, like controls, width, height and src can be placed in any order, but video must be placed before all else. Next to it, controls makes sure that the visitor has a control bar to play and stop the video. Without controls, you will see the first frame of the video but you can’t make it play, unless you set autoplay, like this:
<video autoplay width="100%" src="https://mydomain.com/myvideo.mp4">
</video>
The video will start to play automatically. Problem is that the visitor won’t be able to stop the video because there is no control bar. This may be great to force someone to watch the video all to the end as indeed some website owners do. However, this technique is regarded as user unfriendly and Google doesn’t like it too much either, so it is best to include controls.
width can be set to either pixels or percentage. If width is set to pixels, you need to include height as well and it must be in pixels too, like this:
<video controls width="500" height="380" src="https://mydomain.com/myvideo.mp4">
</video>
If set to percentage, the video enlarges or shrinks in relationship with the space it is embedded in and the height adapts automatically. This is what is called “responsive behavior”, the preferred method today.
Some CMS do not accept the video tag without a defined height. In that case, you can add height=”auto”.
Src is the full or relative path to the media file. The first line of code can contain quite a few attributes which we explore later on. Finally, we close off the opening tag with </video>.
Something else we best take care of is what to do when some older browsers can’t show html5 video. For this, you can add a warning, like:
<video controls width="100%" height="auto" src=”https://mydomain.com/myvideo.mp4”>
Sorry, your browser doesn’t support HTML5 media.
</video>
Only old browsers will see this notice. In a few years, we probably can leave this warning out. Although very simple and easy to do, this first example lacks quite a few things in order to make it work efficiently across various browsers, including mobiles.
Embedding an HTML5 video with fallback options
Instead of placing the media file directly in the video tag with src, we can use the source tag to include fallback options for the mp4 video. Consider the following example:
<video controls width="100%">
<source src="https://mydomain.com/myvideo.mp4 type="video/mp4"/>
<source src="https://mydomain.com/myvideo.webm type="video/webm"/>
<source src="https://mydomain.com/myvideo.ogv type="video/ogg"/>
Sorry, your browser doesn’t support HTML5 media.
</video>
Note that we added 3 video sources in order of importance; myvideo.mp4, myvideo.webm, myvideo.ogv. This means that if the mp4 video cannot be played, the browser tries the webm version and if that doesn’t work, it tries the ogg version.
type tells the browser what type of video this is. As you can see, it is different for each format. The official word for this is mime-type. Although not strictly needed, by adding the mime-type the browser reacts faster as it doesn’t need to find out how to treat the video.
Here is a list of common mime-types: https://developer.mozilla.org/en-US/docs/Web/HTTP/Basics_of_HTTP/MIME_types/Complete_list_of_MIME_types
Adding a subtitle track in HTML5
We continue with the example above and show how to add subtitles tracks. How to create subtitles is explained in How to create captions/subtitles for video and audio in WebVTT, SRT, DFXP format. HTML5 video works best with WEBVTT (.vtt) since this format is supported by iPad also.
You can add a subtitle track just below the last video source, like this:
<video controls width="100%">
<source src="https://mydomain.com/myvideo.mp4 type="video/mp4"/>
<source src="https://mydomain.com/myvideo.webm type="video/webm"/>
<source src="https://mydomain.com/myvideo.ogv type="video/ogg"/>
<track src=" https://mydomain.com/subtitle-en.vtt" kind="subtitles" srclang="en" label="English">
Sorry, your browser doesn’t support HTML5 media.
</video>
src speaks for itself, it can be a full or relative path to the subtitle file.
kind is either captions or subtitles. Browsers are supposed to treat them differently. If you include a description of sounds, for example, then you set it to captions, otherwise subtitles.
srclang is the language code.
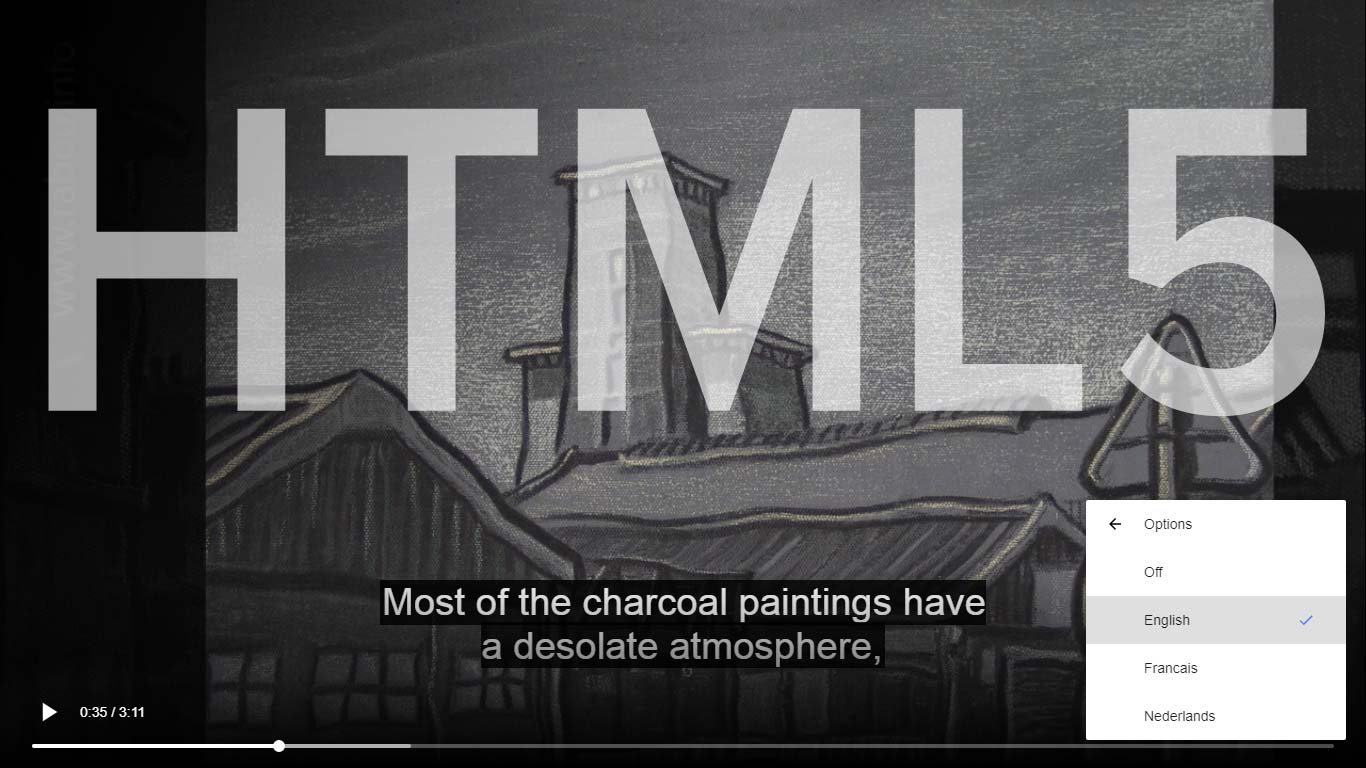
The label is what shows up in the Captions menu. In this case English.
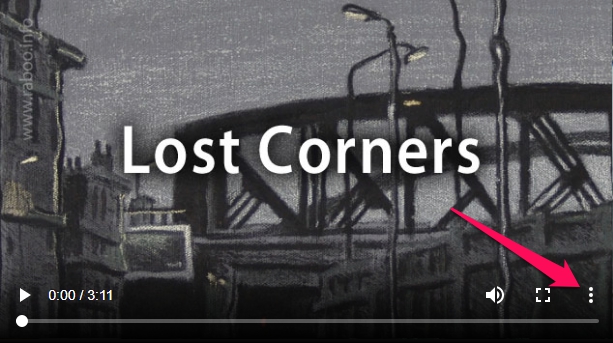
The captions menu is located in the video area at the bottom right under the 3 dots:
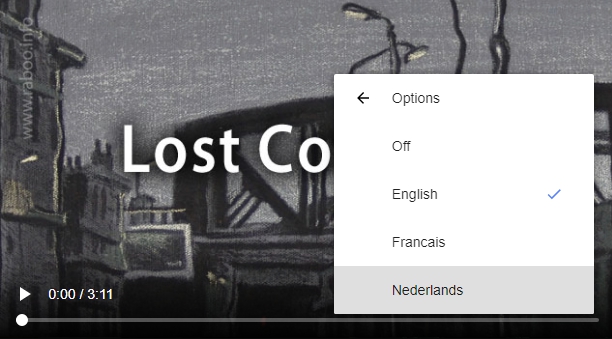
You can add multiple languages, like this:
<video controls width="100%">
   <source src="https://mydomain.com/myvideo.mp4 type="video/mp4"/>
   <source src="https://mydomain.com/myvideo.webm type="video/webm"/>
   <source src="https://mydomain.com/myvideo.ogv type="video/ogg"/>
   <track src=" https://mydomain.com/subtitle-en.vtt" kind="subtitles" srclang="en" label="English">
   <track src=" https://mydomain.com/subtitle-fr.vtt" kind="subtitles" srclang="fr" label="Français">
   <track src=" https://mydomain.com/subtitle-nl.vtt" kind="subtitles" srclang="nl" label="Nederlands">
Sorry, your browser doesn’t support HTML5 media.
</video>
If you want a certain language to show up automatically, you add default to it:
   <track src=" https://mydomain.com/subtitle-en.vtt"  default kind="subtitles" srclang="en" label="English">
   <track src=" https://mydomain.com/subtitle-fr.vtt" kind="subtitles" srclang="fr" label="Français">
   <track src=" https://mydomain.com/subtitle-nl.vtt" kind="subtitles" srclang="nl" label="Nederlands">
Now the English subtitles will show automatically and the other language options are available under the captions menu:
In the following examples, we leave out the subtitle tracks for simplicity, at the bottom, we retake everything and show a live example.
Fine tuning HTML5 video embedding with various attributes
Building further on the example above, we fine-tune the embedding with the additional attributes listed below:
- poster
- autostart
- preload
- controlslist
- loop
- disablePictureInPicture
A full list of attributes can be found here: https://developer.mozilla.org/en-US/docs/Web/HTML/Element/video#Attributes
1. poster
poster sets a poster image instead of the first frame of the video. This is useful if you want to show a relevant screenshot of the video or a combination of text and image. You will need to prepare that upfront, and upload best where your video is located, so that everything stays together.
<video controls loop width="100%" preload="metadata" controlslist="nodownload"
 poster="https://mydomain.com/myposter.jpg">
or if the poster is located in a folder on your site:
<video controls loop width="100%" preload="metadata" controlslist="nodownload"
 poster="images/myposter.jpg">
2. autostart
We mentioned this already in relation to controls, this attribute takes no values. autostart simply starts the video automatically. If visitors expect this behavior (like in YouTube, NetFlix,…), it is a convenient feature. Google doesn’t like auto starting videos when they appear to be very short as they might be advertising. Therefore, Google’s AI software may decide to disable autostart on your page(s). Note that autoplay is automatically disabled on mobiles.
3. preload
This has 3 options: none, metadata, auto. If not set, the default is auto.
auto presumes that the whole video can be downloaded even if the visitor doesn’t activate the video. The word auto is chosen because it behaves differently depending on the device. On desktop computers/laptops, the video is automatically downloaded except on mobiles (to preserve bandwidth).
none means that nothing is buffered or downloaded upon page load.
metadata only loads header information about the video, like resolution, bitrate, etc.
OK, so what do you select? Let’s propose a few scenarios:
When there is a video and nothing else on the page you probably want to set the preload to auto, so that it is buffered immediately after page load, because the chance that the visitor is actually going to play the video is quite big. This way, the video will start almost immediately when the visitor activates it.
If your video is embedded with a lot of text on the page, it is probably better to use metadata so that the video is not automatically downloaded, only the header information, which is very small. This can spare you quite some bandwidth and this is important when your media is on CloudFront or another cloud service where you pay for the bandwidth and for each file request.
I would use none only when you have a whole range of videos on the same page but you could use metadata also. It doesn’t add much overhead.
When autoplay is set, preload is ignored because in order to automatically play the video, it needs to be loaded first, doesn’t it? Here is how you set preload:
<video controls width="100%" preload="metadata" poster="https://mydomain.com/myposter.jpg">
   <source src="https://mydomain.com/myvideo.mp4 type="video/mp4"/>
   <source src="https://mydomain.com/myvideo.webm type="video/webm"/>
   <source src="https://mydomain.com/myvideo.ogv type="video/ogg"/>
Sorry, your browser doesn’t support HTML5 media.
</video>
4. controlslist
controlslist can disable a couple of standard features, namely: nodownload, nofullscreen and noremoteplayback.
You don’t want to make it super easy to download your video? Set controlslist to nodownload. This disables the download menu item at the bottom right.
nofullscreen disables the full screen button. Useful when your video is low resolution, which would look bad in full screen.
noremoteplayback isn’t very useful unless you want the video only to play in Picture in picture mode, so I generally leave this option out. I couldn’t find another use for noremoteplayback. Here is how you set controlslist:
<video controls width="100%" preload="metadata" controlslist="nodownload"
poster="https://mydomain.com/myposter.jpg">
   <source src="https://mydomain.com/myvideo.mp4 type="video/mp4"/>
  <source src="https://mydomain.com/myvideo.webm type="video/webm"/>
  <source src="https://mydomain.com/myvideo.ogv type="video/ogg"/>
Sorry, your browser doesn’t support HTML5 media.
</video>
You can also combine features in the controlslist by separating them with a space, like:
<video controls width="100%" preload="metadata" controlslist="nodownload nofullscreen noremoteplayback">
5. loop
loop has no values to choose from. When set, it repeats the video endlessly unless the visitor stops it by using the pause button. This can be quite useful for short videos (and audios). Set it like this:
<video controls loop width="100%" preload="metadata" controlslist="nodownload"
poster="https://mydomain.com/myposter.jpg">
6. disablePictureInPicture
This disables the menu item Picture in picture option at the bottom right of the video area. It has no values to choose from. Set it like this (be careful, this is case sensitive!):
<video controls loop width="100%" preload="metadata" controlslist="nodownload"
poster="https://mydomain.com/myposter.jpg" disablePictureInPicture>
Set like this, the icon with the three dots at the bottom right will no longer show, unless you have subtitles.
How to disable the context menu?
OK, we can disable the download menu with controlslist=”nodowload” but that still leaves the context menu that shows up when a visitor right clicks in the video area and that has quite a few possibilities to download the video:
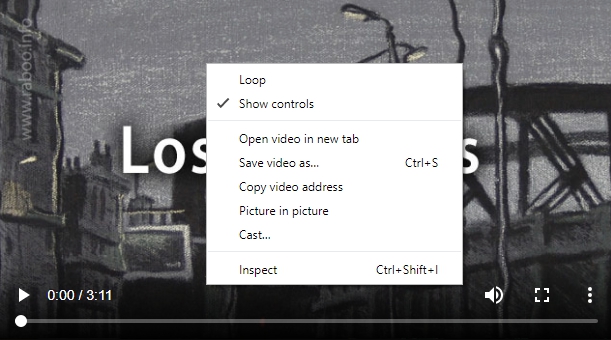
If that is no problem for you, skip this step, otherwise keep reading.
Consider this example:
<video controls width="100%" preload="metadata" controlslist="nodownload"
poster="https://mydomain.com/myposter.jpg">
<source src="https://mydomain.com/myvideo.mp4 type="video/mp4"/>
<source src="https://mydomain.com/myvideo.webm type="video/webm"/>
<source src="https://mydomain.com/myvideo.ogv type="video/ogg"/>
Sorry, your browser doesn’t support HTML5 media.
</video>
We can wrap the embedding code in a div element, like this:
<div>
<video controls width="100%" preload="metadata" controlslist="nodownload"
poster="https://mydomain.com/myposter.jpg">
<source src="https://mydomain.com/myvideo.mp4 type="video/mp4"/>
<source src="https://mydomain.com/myvideo.webm type="video/webm"/>
<source src="https://mydomain.com/myvideo.ogv type="video/ogg"/>
Sorry, your browser doesn’t support HTML5 media.
</video>
</div>
On its own, that does nothing, but when you add oncontextmenu=”return false;” in the opening tag of the div element, you disable the right click context menu completely. Thus we get:
<div oncontextmenu="return false;">
<video controls width="100%" preload="metadata" controlslist="nodownload"
poster="https://mydomain.com/myposter.jpg">
<source src="https://mydomain.com/myvideo.mp4 type="video/mp4"/>
<source src="https://mydomain.com/myvideo.webm type="video/webm"/>
<source src="https://mydomain.com/myvideo.ogv type="video/ogg"/>
Sorry, your browser doesn’t support HTML5 media.
</video>
</div>
Both controlslist and the measure above at least make downloading a little less obvious, but it won’t prevent it completely. I can see that in some situations providing a download link is useful, but I don’t think it should be standard.
Demo HTML5 video example with all whistles and bells
And here you get the final result, a video with two fallbacks, a poster image, three subtitle files in English, French and Dutch, with download link and context menu disabled:
That’s how it works.
Final embedding code example:
<div oncontextmenu="return false;">
<video controls width="100%" height="auto" preload="metadata" controlslist="nodownload" poster=" https://d1xt3u4si7b3pj.cloudfront.net/lost-corners-intro.jpg">
<source src="https://mydomain.com/myvideo.mp4 type="video/mp4"/>
<source src="https://mydomain.com/myvideo.webm type="video/webm"/>
<source src="https://mydomain.com/myvideo.ogv type="video/ogg"/>
<track src=" https://mydomain.com/subtitle-en.vtt" kind="subtitles" srclang="en" label="English" default>
<track src=" https://mydomain.com/subtitle-fr.vtt" kind="subtitles" srclang="en" label="Français">
<track src=" https://mydomain.com/subtitle-nl.vtt" kind="subtitles" srclang="en" label="Nederlands">
Sorry, your browser does not support the video tag.
</video>
</div>
You can use this embedding code in WordPress as well, but you have to set the editor to Text mode instead of Visual (if you work with the classic editor) and under no circumstances go back to Visual mode. Because WordPress interferes with your carefully crafted embedding code, removing features and even changing the height of the video to 150.
Therefore, to avoid frustration on any CMS, it is a good idea to have a copy of your embedding code in a text file, so that you can correct these erratic changes.
Incidentally, when you only place the path to a video in the Visual editor of WordPress, it transforms it into a html5 code, but you have none of the additional attributes described above.
Troubleshooting with HTML5 video embedding
If your video doesn’t work or the subtitles don’t show, chances are that something is wrong with the link to the file. Examine your code and test the path to the file by isolating it and copying it. Then past it in the address bar of your browser. If that gives an 404 error, you made a typo. Perhaps you forgot to include the folder, or the name of the file is misspelled. It happens to all of us.
When the video format can’t be played while the pathis correct, something is wrong with the video codec. This is harder to pinpoint. Try another video converter.
Resource interpreted as TextTrack but transferred with MIME type application/octet-stream
Using subtitles or captions may result in the evaluation error above wen you inspect the page with a web developer tool, although in most cases subtitles will show. To get rid of that warning, open or create the .htaccess file in the root of your domain and add the following on a new line:
AddType text/vtt .vtt
Then save the change.

We hope this is useful to you and if you need any help with your embedding, leave a comment below, preferably with an example page, but we have to ask you not use this as a way to get free publicity for some product or service. We moderate comments before publishing, therefore spam makes no chance.
Thank you very much, I’ve been looking for a script exactly like this for a very long time, this works flawlessly !!! Again, thanks for sharing these tips, not many know about these shortcuts as its not advertised by any means ! I have multiple web sites for Our Flight Sim Pilots, since 2002. We have over 300 members easily and all love the new skin I’m working on (below test site).
thanks again from Heritage Virtual Airlines
This is very interested article!