Update 30 July 2022
You want to ensure that everyone, or at least most people can watch your video? Then you have to create a video that works on the web and mobile devices such as iPhone, iPad, iPod Touch and other handheld devices. This is not evident and you may count on it that being compatible with these devices does not guarantee it will work on all video capable mobiles. But at least you get close.
The hard truth is that if you want to cover every device, you need to encode several formats and create complicated workarounds to get them to play, depending on the device. In this tutorial we do not go deeper into this wasp nest, we are going to show you how to encode a video in such a way that it plays successfully on the most common denominator, including streaming video delivered via RTMP software.
Which application to use for conversions?
I did tests with several converters and one of them came out pretty good: HandBrake.
HandBrake is available on Windows, Mac OS and Linux. It is a free application, very convenient and easy to deal with, while producing decent output.
OK, let’s download and install it. When ready, read on to jump right into practice.
Preparing HandBrake for future use
When you open HandBrake the first time, it is a good idea to show the Presets of encoding profiles. These profiles make it easy for you because they have various parameters already set. In order to see those presets, click on the icon called Toggle Presets at the top right:

This opens a Preset sidebar showing various profiles which are grayed out currently:
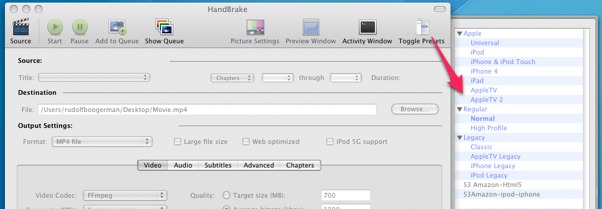
The only thing you need to do then is select a profile and adapt it according to your needs. Then test it and if you find it does what you expect, save that profile under a custom name so that you can retrieve it in the future.
But first, you need to select the source, that is the video you want to convert, otherwise nothing happens when you click on a preset. In fact, most icons at the top are grayed out until you have allocated the source, so let’s do that now. Click on the icon Source:

This opens a dialog box to select a video. HandBrake accepts nearly any sort of video file you can throw at it. It feels completely at home with DVD files and even .iso images but for the sake of simplicity, I’m using a regular video format as example, namely a .MOV (QuickTime).
NOTE: it is important to work with a master file as the Source. What is a master file? This is the original video shoot that is not- or very lightly compressed, and the bigger the size, the better the end result will be. If you start out with a video that is heavily compressed, you are not going to get an acceptable end result.
When you selected your video, the length of the video and other info shows up, while various icons become active, including the Preset sidebar (not shown in this screenshot):

Now, you need to set the Destination file. This is the path and name of the video that will be your end result.
Size matters
Sounds like a porn slogan, although in this case “smaller is better“. 😉
Seriously, mobile devices like iPhone or iPod have limits, so they determine the maximum size for your website as well. The good news is that we can force this a little bit. Older iPhones are supposed to play 480×272 videos, but today newer generation mobiles can handle bigger formats, so you can go easily to 1280 x 720 or even 1920×1080 if your phone has G5 capability.
720×400 pixels won’t look as crisp as the full HD format of 1920×1080 in full screen on your computer, but it is still acceptable, so in this tutorial we go for this format, feel free to adapt it if you like. It plays fine on all mentioned devices, so there is no reason to go smaller, UNLESS your original video is smaller. There is absolutely no point in enlarging the size of the original master video because it only deteriorates the end result and it makes the video unnecessarily bigger.
Selecting a preset profile
I found that the best profile to start from in this situation is the iPhone & iPod Touch preset.
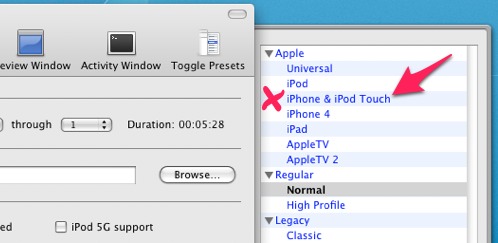
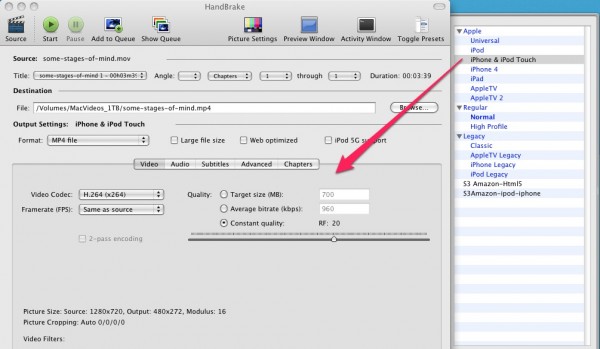
When you click on that preset, a whole range of options is automatically set in the main window:
The quick tour
First I’m going to give you the quick tour to get you on your way. After that, I’ll explain every facet of the preset. For now, only three points are important and that is to make sure that the format is set to MP4:

You may want to tick the checkbox Web optimized as well, so that in progressive download mode, the video doesn’t take too long to start playing.
Than, Framerate (FPS) is set to 29.97 (NTSC Video). Do not mind the expression NTSC Video in itself, it has no importance here nor influence on the interlacing of the video:

Thirdly, we need to adjust the resolution of the video because currently it is set to 480×272. We can see that at the bottom of the window:
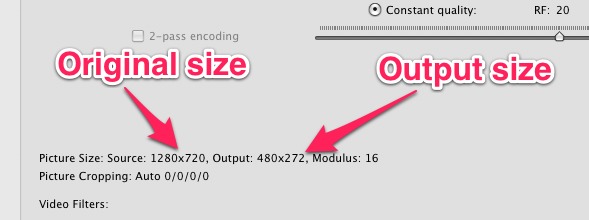
Click on the icon Picture Settings on the top middle:

This opens a dark gray dialog box. Before you do anything else, make sure Keep Aspect Ratio is ticked:
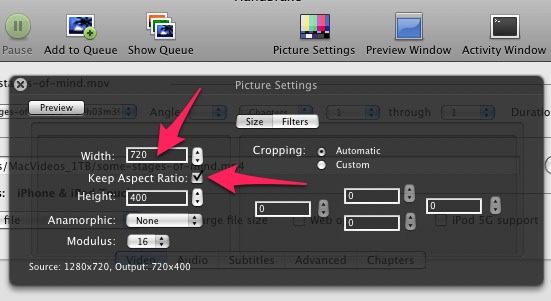
Then set the Width to 720. The Height will automatically adjust itself when Keep Aspect Ratio is enabled.
Then, close this dialog box by clicking the X at the top left.
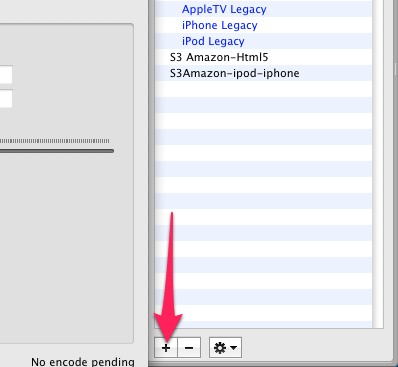
We are ready to save this preset for future use. Click the + sign at the bottom of the Preset pane:
A new dialog box opens. Here you only need to fill in a Preset name and a Description, so that you remember what this preset is about later on.
All current settings are automatically saved within that preset which includes the changed dimensions, so you do not need to change the Picture Settings in this dialog box:
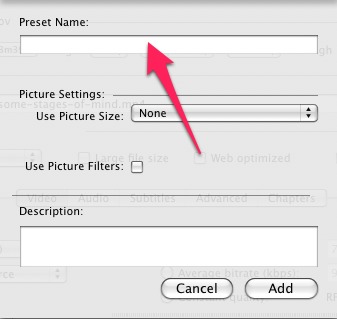
Leave Use Picture Filters disabled and click Add when you are done. I called my preset S3 Amazon-iphone-ipod because with this setting, you can play private streaming videos via S3 Amazon/cloudFront and play it in iPhone, iPad, iPod, iTouch and any mobiles which support MP4 videos. HandBrake conveniently places your preset in black at the bottom of the list to differentiate with the standard presets. I find this very handy and this is what I miss in AVS Video converter.
If you click on various presets, you see the values in the main window change. Select again your own preset and start the conversion by clicking on the Start icon at the top left, next to Source:

The encoding process start now and at the bottom of the main window you can follow its progress. This may look slightly different on Windows:

Do not get confused by the encoding information you see there. The framerate (fps) only indicates the speed of encoding here. The framerate of 29.97fp is respected. You made no mistake, so relax and let Handbrake finish its job. 🙂
Handbrake tells you when it is done converting. It also gives a warning signal, so you do not need to sit there and stare until it is ready. Grab a coffee or a snack and wait for the *ping*.

When you embed the video in your site, you will normally get a good quality video. Embedding with HTML5 fallback itself will be explained in the next tutorial.
And now it is time for the gritty details for those of you who want to get to the bottom of this and tweak the encoding method to enhance the quality (in as far that is needed).
Looking under the hood
First of all, it is important to realize that the preset you just made works perfectly in all above mentioned devices. So, if you change something, you may break the spell. But do not worry, I will tell you which settings must remain the same, even if it means sacrificing quality.
Format: This is the container in which the video will be wrapped. It can be set to MP4 or MKV, but MKV is not supported by all browsers and it will not work on S3 Amazon in private streaming mode, so you have to keep MP4 selected to be on the safe side.
Below Format, make sure Video is selected in the main window. This will look slightly different in Windows:
![]()
Vido Codec: can be set to MPEG-4 or H.264. It has to be set to H.264 (x264), otherwise it will not work with the Apple devices nor with streaming using RTMP software.
Quality: This can be set to 3 types, namely Target size, Average bitrate or Constant quality.
- Target size is the least ideal because it limits the weight of the video to a certain amount of Megabytes and unless you set this high, you are not going to get constant quality.
- Average bitrate: also called ABR, not to be confused with Variable Bitrate (VBR) which generally gives the best quality. Average bitrate is slower to process and as with Target size, you give up control over the quality of your video in favor of a smaller file. Bitrates are expressed in kilobits and the bigger you video is, the more kilobits per second you will have to give to get a good result. iPhone cannot handle this technique, so this option is out of the question in this case. See http://en.wikipedia.org/wiki/Average_bitrate for more info on bitrate types.
- Constant quality: also called Constant bitrate or CBR, makes sure that the kilobits per second are always equal. With complex image parts, this will give lower quality, while with relatively simple images, the quality will go up again. Normally, for streaming you are supposed to use CBR and for mobiles it is required. HandBrake claims that Constant quality is better then Average bitrate, which is a bit strange as the general consensus is that Average bitrate gives better quality, but we work in the HandBrake environment, so here we better believe it 🙂
The Quality slider of RF ranges from (Low Quality) 51 to 0 (High Quality). For good quality output at reasonable file sizes: 20 is fine for our video resolution while you may get away with 22 for HD of 1280×720. Be aware that slight changes make huge differences in weight of the output file. RF 0 is loss-less, meaning no compression at all.
Peak Framerate (VFR): the maximum framerate, actually meant for DVD. Leave it open, it has nothing to do with us in this situation. Handbrake is actually made to rip DVDs but it can do a lot more.
It is time to look into the Audio section. Click the button Audio:

Track: This is automatically selected if you have one audio track in your video, which is usually the case.
Codec: This is the type of compression method used for the audio in the video. It is automatically set to AAC(CoreAudio) if you are on Mac, otherwise it is AAC(faac) when you selected the preset for iphone, ipod and iTouch. But there are other codecs as well, so I will sum them up here:
- AAC(CoreAudio): only available on Mac OSX. It is Apple’s core audio codec for Apple devices. It works with RTMP streaming video too, so we need this option. It provides higher quality than MP3. On Windows, select the next option:
- AAC(faac): set standard on Windows when you selected our preset for iphone, ipod and iTouch. Provides higher quality than MP3 although this claim is not shared by everyone, especially not for the faac library. Faac is not as good as CoreAudio, but on Windows we have no alternative in this situation, we simply need AAC.
- MP3 (lame): Uses the renowned Lame encoder. MP3 gives good quality when the bitrate is set high enough.
- AC3: uses ffmpeg encoding. This is not the same as Passthru. You can encode any audio track to AC3, but we cannot use it in our situation.
Mixdown: offers two options, Mono and Stereo. Apple devices require Stereo, so leave it on Stereo, even if your original is mono.
Samplerate: or Sampling frequency defines the number of samples per second. You can leave this setting on Auto or experiment with 44.1 KHz or 48KHz. Don’t use the lower values like 32KHz and lower. It deteriorates the sound quality significantly and I doubt iPhone will support it anyway.
Bitrate: Ranges here from 64 to 320. Standard set to 128Kbps, meaning 128 kilobits per second. This is the absolute minimum. Below 128, sound deteriorates rapidly. If your video is not very long, go for a higher value where 320 is a bit over the top for the web and mobiles and 192 very good.
DCR: DRC tunes up softer sounds, which can be useful when listening using headphones or low quality speakers. If you want to use DRC, select a range between 1 and 1.5.
Subtitles is outside the scope of this article since it is meant for DVD videos.
The Advanced section gives us a whole range of options:
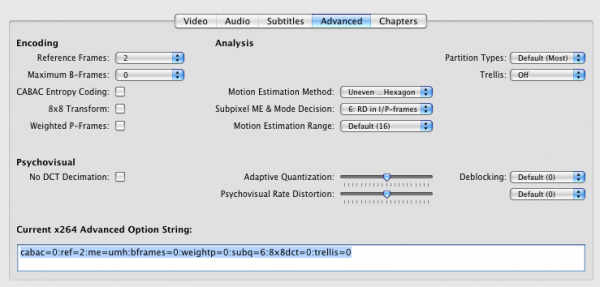
In our case, we do not need to change anything here, but I’ll explain every option so that you can tweak it if you run into quality issues.
Reference frames: Ranges from 2 to 16. A reasonable setting is between 1 and 6. Handbrake recommends 2 for handheld devices since they cannot handle more reference frames. The more reference frames, the better the compression, meaning higher quality. It also takes longer to encode.
Maximum B-frames: B-frames are responsible for the interpretation of motion in the video. Here you specify the maximum amount of B-frames the encoder can use. A reasonable setting is between 2 and 5, however for iPod and similar devices it is best to keep this to 0, which is the so called Baseline profile required for mobiles. See the Wikipedia page for more info on I,P, B-frames.
CABAC entropy Coding: or to use an incomprehensible expression: Context Adaptive Binary Arithmic Coding. This basically increases the efficiency of compression without quality loss. This should only be unchecked if the video is played on a portable device with a slow processor. This means we need to keep it disabled for our video.
8×8 Transform: Gives a higher quality compression for only a fraction more encoding time. Alas, this requires a High Profile, which excludes handheld devices. Leave disabled in our case.
Weighted P-frames: Improves the quality of compression and especially fades profit from this feature. Incompatible with Baseline Profile, thus leave disabled for handhelds. Does not work with Apple TV either. See the Wikipedia page for more info on I,P, B-frames.
No DCT Decimation: Use only if you have banding in your video or when you have trouble keeping fine grains intact.
Motion Estimation Method: this determines how the encoder determines movement in the video. The better it can predict where a movement is going, the better the encoding will be. However, every method has its merits depending on the video content. Handbrake offers 5 methods:
- Default (Hexagon): performs a somewhat slower but more effective search then Diamond using a hexagon pattern.
- Diamond: performs a fast and simple search using a diamond pattern to look for movement.
- Uneven multi-hexagon: performs a thorough search using a variety of patterns accurately capturing complex motion.
- Exhaustive: is generally overkill in a sense that is does a search on pixel level motion, resulting in a slow process with little compression gain.
- Transformed exhaustive: like Exhaustive, but it makes more accurate decisions, again quite slower and not much gained in relation with the effort it takes. However, is some circumstances this may give a better result. I would use Exhaustive when the video output is not good enough, when every little bit helps improving the end result.
With regular videos, Uneven multi-hexagon is a good choice.
Subpixel ME & Mode Decision: Motion estimation (ME) is one of the most time-consuming parts in video encoding. This controls subpixel-precision motion estimation and mode decision methods, which probably won’t tell you anything useful 🙂
What you need to remember for this option is that the method goes beyond pixel per pixel accuracy, it measures values in between pixels too, hence the expression sub-pixels. HandBrake offers no less then 10 methods, of which 6: RD in I/P-frames is set default in our case. 6 and higher are strongly recommended.
We can distinguish 4 group types: SAD, SATD, RD and QPRD:
- SAD: is the fasted method as it actually does not include sub-pixels. Therefore the method is quite sloppy.
- SATD: is a bit better although still not good enough for quality output.
- RD: is more like it because it takes I and P frames into account. See the Wikipedia page for more info on I,P, B-frames.
- QPRD: is the most powerful and slow option. It requires Trellis set to 2, which basically rules out this option for mobiles because in order to use Trellis, CBAC needs to be enabled and that is not possible in our case.
Therefore, RD is our best choice and we should leave it at that.
Motion Estimation Range: does not apply to Hexagon or Diamond search options. In our preset set to Default (16) but it doesn’t really matter since we use multi-uneven Hexagon as the Motion Estimation Method. It ranges from 4 to 64. The default is fine for general purpose but a high motion HD video may benefit from a higher value, slowing down the encoding process.
Adaptive quantization: Default this is set to 1. It controls how the encoder distributes parts on the frame. Higher values take away bits from the edges and more complex areas to improve areas with finer detail. You may want to experiment with this to improve results but 1 is a good general purpose setting.
Psychovisual Rate Distortion: sounds like a mental disease but it actually means this method takes advantage of the characteristics of human vision to improve detail and sharpness. You may think: “Huh? What the hell is this?“, so let me rephrase this: It’s a formula to make us humans interpret something as sharp, although it isn’t really sharp. Compare it with the Unsharpen mask of Adobe Photoshop and you will see what I mean.
The effect can be made stronger or weaker by adjusting the strength. Default it is set to 1.
Partition Types: The more partitions used, the better the output and the slower the encoding. Default it is set to Most, which is an acceptable average. You can chose between None, Some, Most and All.
Trellis: improves output quality while maintaining a small output file, in return for a little more encoding time, but it requires CABAC and the High Profile setting, so it is out of the question in our case. Don’t worry, you will not miss it in most cases.
Deblocking: Keep this to 0 in our case because higher values require more CPU power which handhelds lack. It helps reducing artifacts after decoding each frame. Artifacts are visible clusters of pixels which you often can discover in DVD videos, especially in dark areas.
As you can see, there is not much to change so far, which shows that HandBrake presets are quite good. Hopefully you learned something from this without being overwhelmed too much with technical detail.

Thanks for explaining what all the settings mean Rudolf! I’ve been using Handbrake for several months, but it was kind of hit and miss. I had my own version of your notes, from my trials and errors. Nice to have everything properly set out.
Thanks Marlene, I’m glad this is useful to you.
Can’t wait for your HTML 5 tutorial to finish this off!
That will be for next week. 😉
Hi,
Great tutorials and info!
I am new to wordpress, have started a blog on my personal domain and would like to embed some video.
The first issue I came across was the dreaded max file limit….so I uploaded the movies into a folder outside of wordpress, but on my site.
I built the movies in iMovie and ran them through Quicktime on my mac and used the save for web tab which gave this file along with the movies for ipad, iphone and computer.
http://www.kennedys.ws/movies/unpackjuicer.html
I was wondering if there’s a way to use these or do I need to go the way of the almighty handbrake. I’ve tried Embed Quicktime and QTVR but those don’t play nicely with what quicktime says to do.
thx
shaun
It is best to upload video via FTP, yes. You can increase the maximum file limit but it is quicker via FTP anyway.
My experience is that videos from iMovie are not iphone compatible, so I suggest you get Handbrake and convert your video to mp4 since it is the standard acceptable to most browsers, although Chrome has announced it will no longer support mp4.
The unpackjuicer on the link you showed behaved strange on Firefox.
You might want to circumvent browser wars and use JWplayer as the intermediate player. The embedding cde is a bit more complicated, but here is a tutorial for it: https://www.miracletutorials.com/embed-streaming-video-audio-with-html5-fallback/
I hope this helps?
very Very good tutorial here!
Working with a 1920×1080 .mov I notice I loose 8 pixels when reducing the file to 640×360. Result is 640×352. Changing the modulus from 16 to 8,4 or 2 solves this. I have found little info on modulus and what it does. Can you explain?
Thanks
The modulus is the remainder when compressing a video into larger sized blocks. In other words, what is left over after calculating the blocks of pixels. In HandBrake it seems to influence the size of the video. They indeed give very little information about the subject. If you really want to know about this subject, I think you should contact support of HandBrake, but brace yourself for a rather technical explanation because this is quite advanced.
Very good tutorial, easy to follow and yet very thorough. I have been using HB to encode for my Samsung TV and for streaming to iPad and iPhone, and I will improve my own settings with your tips. Just one question: I thought that CQ was not CBR as you said,but a VBR to maintain always the same quality. Unfortunately in streaming this is BAD because you can end up with a bitrate too high for the iPhone to handle.
Yes Fernando, you are right, the expression CQ is confusing. Technically speaking Constant Quality is equal to VBR or variable bitrate that gives constant quality, but Handbrake decided to call Constant Bitrate (CBR), meaning keeping the same bitrate all the time, CQ.
You will find that many converters have minds of their own about technical expressions and that makes it confusing sometimes. Thank you very much for that remark.
Variable bitrate is indeed not ideal for streaming, certainly not for iPhone, but I do use it if the video is meant for a limited environment of which I know the internet connection is really good, like universities or big corporations.
HELP! I tried following this to a T, and STILL my video takes forever and a day to load in JW player embed on my wordpress page. It’s a 20-minute video. Orig is 206 megs. I use a mac and handbrake (as per instructions above).
STILL, the video will not finish loading or start playing. I use Amazon S3. All that cloudfront stuff and CNAME and all is just over my head. Can’t I just use S3 and JW Player and wordpress ???? (Like other people???)
ANY TIPS on how to encode my video a little better/differently on Handbrake to make it work??
Oh please let me know, someone!!! Please!!! :-0
THANKS!!! wolring[at]yahoo.com
PS: HELP!
Please *adapt* article for adaptive streaming as the article’s engineered interweb engine results suggested it explained — but didn’t 🙁
Using only f/OSS to create the chunks and other meta files for using in flash
Hi Bob,
You actually do not need to prepare videos for adaptive streaming, except that you have to provide various versions that play on a different bitrate.
So, basically, you only need to adapt the profile by setting different bitrates per video.
Then you reference to the various versions of the same video in an XML file.
Since this is a rather advanced subject, I give you the link to the article from Longtail video that explains how to use adaptive streaming with their player: http://www.longtailvideo.com/support/jw-player/jw-player-for-flash-v5/16012/setting-up-rtmp-dynamic-streaming
It also contains the syntax how to set it up. Combined with this tutorial here: https://www.miracletutorials.com/embed-streaming-video-audio-with-html5-fallback/
I hope this is useful to you?
Keep in mind that the browsers supporting HTML5 do not support adaptive streaming yet.
@Loretta, not sure if your issue is the same as mine, but my videos wouldn’t play in Firefox/Chrome (using JW Player) until the entire video was downloaded. The solution I found was to run the files through a tool called QT Index Swapper at http://renaun.com/blog/code/qtindexswapper/. My understanding is that this tools moves metadata to the beginning of the file as it’s read, allowing the file to play as it’s being cached. BTW, I claim no expertise, just sharing a solution I found. Someone else, feel free to trump me! 🙂
That is a good solution, Brett.
Personally, I avoid using progressive download, but I can understand that not everyone wants to mess around with CloudFront.
So yes, Loretta, you can play video just like everybody else using Brett’s solution.
Hi Rudolf!
Thanks a lot for putting this together. These are the settings I used in conjunction with S3Media Stream + CloudFront for a client project but had since forgotten the settings!
Now I’m working with another client and I remembered you had this site.
And congrats on the latest S3Media Stream release. Looks sexy! 🙂
Best Wishes,
Vic
Thank you, Victor! FYI: I arranged with LongTailVideo that a yearly subscription is not needed. I can keep shipping S3Media Stream with JW player 5.10, which is in a couple of areas better the than new JW player 6.0. You may want to check out my report on JW Player 6.0: https://www.miracletutorials.com/should-i-upgrade-to-jw-player-pro-6-0-or-premium/
Agreed! I’m missing the ‘modes’ feature.
I tried implementing RTMP + Cloudfront on a client site with HTML5 fallback using JWPlayer 6 and just couldn’t get it going.
So went with the free JS-player, which doesn’t support RTMP but worked across all the iDoohickies, albeit with progressive download.
Great to hear that you don’t need a year license with S3Media Stream, too.
Hi Vic,
It should work, though. I have not tested it myself yet. I will do it this weekend.