To keep the microphone out of view while holding close to the interviewee you have 3 options: either use a mic stand, a boom pole or, under certain conditions, attach the mic to the camcorder. If you are on your own, using a boom pole can be impractical, because you have to monitor your camcorder and other details. Instead, you can use a telescopic mic stand. They are about $30 to $50 and you would be surprised how versatile they are. I often use them to attach spotlights as well, but that is beside the point here. Attaching a mic on a camcorder is not ideal unless you want to take a close-up of the interviewee or speaker. But in general, using a mic stand gives you more possibilities.
Either way, using a mic stand or a boom pole, you position the mic in such a way that it is just outside the view of the camera frame, either above or below the frame range of the camera, like this:
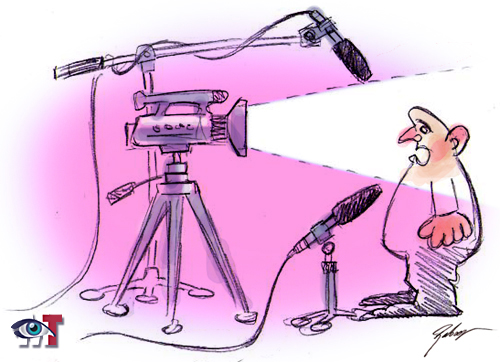
Placing the mic next to the camera at mouth level is not such a great idea because the interviewee might turn his head towards the mic and that is not always desirable. You also may find that the positions depicted above will bring the mic closer to the subject then sideways. The reason is that the picture frame is landscape, a rectangle with its longest side horizontally, therefore the mic is further away. However, do not take this as an absolute rule because everything depends on the circumstances.
Normally, the best thing is to direct the mic towards the mouth or the cavety of the chest. The ideal is to have the mic 2 fists (7-8 inch) away from the speaker’s mouth, but 3 fists is acceptable as well. If you come closer then 7 inch, you may get distortion.
You have to experiment a bit to find out what gives the best result: either having the lower (pointed towards the chest cavity, or higher, pointing directly at the mouth. Because it depends on the acoustics in the space and the voice of the person to interview which will determine the setup as well.
People with, what I would call, a n oily or booming voice, often tilt their heads slightly to get a clearer voice. They mostly do that unconsciously. In that case, best have the mic higher up. However, higher up, you may pick up more environmental sound. As you can see, every setup is a trade off against various parameters.
The more you practice different circumstances before going out interviewing people, the better!
For instance, out on the street, you would be amazed how much street noise you can reduce by keeping the mic at the level of your chest cavity.
What about lapel mics?
Lapel mics are a great solution as well because they are pinned onto the interviewee, and the mics pickup very little environmental sound. They are rather expensive because you need a transmitter too and that adds up quickly. At this time of writing, it costs about $600 for a set of 2 lapel mics with transmitter.
 You also have to watch it that the interviewee doesn’t fiddle with clothing during the interview because that produces a low rumbling sound that is difficult to get rid off. Just moving around can give that effect as well. If you use lapel mics, instruct your interviewees to move only if required. That said, generally the results with lapel mics are great. You get a clear and crisp sound without too much noise. There are cheap lapel mics around, but I would not recommend spending less then $500 USD or you will get junk which you will have to replace anyway if you are concerned about sound quality.
That said, if you are uncertain if you are going to continue doing this sort of activities, you may start out with a cheaper option first and then upgrade when you feel this is for you. The Rode NTG-2 or the NTG-3 directional mics are not that expensive, yet, you can record good quality sound with it if you observe the rules above.