When you upload a 800×600 screen capture video tutorial to YouTube, the quality deteriorates so badly that texts in the video are hardly readable. The reason is that YouTube regards everything smaller then HD video as a free license to shrink the video to a resolution of 480 pixels wide. Viewing it full screen doesn’t help, it even looks worse.
Here is such an example of a video messed up on YouTube after upload: http://www.youtube.com/watch?v=6OAt7VMwCUg and here is the link to the original video showing crisp detail in full screen, with progressive download via S3 Amazon.
The magical solution
What to do about that? Very simple, actually. You produce a HD sized video. For this, you need video editing software like Adobe AfterEffects, Adobe Premiere or Final Cut Express/Pro to import your screen capture video, whether it comes from Camtasia, ScreenFlow or any of the screen capture recorders.
What you basically do is this: If you recorded your screen capture video at the size of 1024×768 pixels, you set up a project of 1280×720 pixels in your video editor of choice.
You import the rendered screen capture video into the project. You then scale the video to the height of 720 pixels:
That will result in a video that has an empty banner space either on the left or the right, depending where you move your original video to fit into the space. In the example below, I leave a little space on the right as well to get a graphical effect:
You can use the empty space to add anything you like. This could be a real banner or simply a line of text, logo, etc… It can be the title of the Video, or referring to a tutorial series, … Just use your imagination. Below, I have done this:
If you do not like black as a background, you can select another color or place an image over it.
What if my screen capture is smaller?
If your screen captured video is smaller, like 800×600 or 640×480, you can ‘lay-out’ your HD video differently. There are actually many ways to lay-out your HD video to get an interesting result. When you import a smaller video into an HD project, it will have borders on the four sides. Here, I show a couple of examples to deal with this:
If you want to make it easy, create an image of 1280×720 with all the background elements and put it behind the screen capture video. Most video editors support this technique. Below you find a fancy example:
In the example above, I’ve put a shadow behind the video. Most video editors support this sort of thing and if yours doesn’t, you can simulate a shadow in the background image. As you can see, a lot is possible if you use your imagination and the great thing is that the video itself will look Cristal clear on YouTube, especially full screen. Not only that, you are branding your business more clearly at the same time.
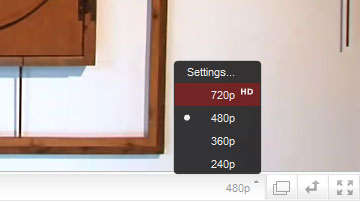 The funny thing is, even if your initial screen capture is only 640×480, embedded in a HD video it will not be re-sized, although a smaller version will be shown on the initial page. As soon as you select HD in the setting list of the YouTube player, you get much better quality and if your visitor plays it full screen, it will be crisp and clear.
Magical or what? 😉
Compression and conversion
Most video editors do not have many useful compression methods and the reason is that they are actually meant to create master videos, not so much an end product. For example, Adobe AfterEffects cannot compress Screen Captures very well. You get quite a lot of artifacts in the video if you use compression, even at a bitrate of 5000Kbps. Therefore I use a conversion tool afterward, like Sorenson Squeeze, AVS Video converter. The latter is much cheaper and excellent to convert screen capture videos (See: Converting video to streaming MP4 for S3 Amazon with AVS Video Converter) but it only exists for Windows. Another one I like is HandBrake, a free converter available for Mac and Windows.
So, what I do is, I render the video in AfterEffects in Quicktime format with Animation selected as the compression method. This gives nearly no compression and I get an excellent master video which can be converted to any format by a conversion tool like AVS Video converter or whatever I fancy, depending on the type of video.
It is important to realize that every converters has its advantages and disadvantages. None of them are good for every type of conversion. The same goes for compression methods. Although H.264 is becoming a standard, it is not so great for screen captured video or talking heads because there is not enough movement in the video. Yet, you can convert screen capture video to H.264 successfully with AVS Video converter or HandBrake, while I might use Sorenson Squeeze for motion pictures.
It is worth the effort?
You might think that you can’t be bothered to do that extra work, and indeed, in the beginning this will consume some time. But once you have your project file saved for re-use and found the ideal compression method, you have a work flow that can be managed largely in the background. For instance, I’m typing this article while in the background a video tutorial in HD format is rendering. Besides, most converters and video editors can ‘batch’ several videos in one go. Meaning: you can pile up a load of videos and let them render automatically, one after the other by the application, while you sip your coffee.
I often let my computer work at night and in the morning I get up and everything is ready. It is purely a question of getting it going. It takes about one day to set it all up: the template for your video editor, the profile for your converter and the background image to use for the videos. After that, it becomes routine in the background. You might even outsource it if it bores you to death 😉
How much time?
Rendering the video to HD in Adobe Aftereffects took 1 hour 44 minutes. Conversion of that master video of 13GB into a manageable size for upload took 39 minutes conversion time. I had already a MP4 profile prepared in AVS Video Converter the day before. See also: Converting video to streaming MP4 for S3 Amazon with AVS Video Converter. The resulting video is 57Mb, which is uploaded and processed on YouTube within an hour. Again, this works in the background. It won’t stop you from doing important work.
Fast track solution for wide screen captures
If you made a wide screen capture, with an aspect ratio(relation width-height) of 16:9, then you can upscale the video with a video converter directly into an HD format of 1280×720. That is a shortcut that will be a lot better then the result on YouTube with a smaller video, even if up-scaling means a slightly blurry result. It will still have readable texts. So, if you can’t be bothered to work with a video editor, this is another option that doesn’t take much time. However, the technique described above is vastly superior.
Have a look at this YouTube video, click Full Screen and tell me if it is not worth it to set it up this way. 😉
Hello Rudolf,
I am facing a problem. Recently we made some nice video using Sony 2100 due to some reason the videos turn out to be very bad, I mean totally bad pixels and bad very bad colours. I don’t know much about editing. I would like to get your suggestions, is there any way we can improve the quality of the videos. Videos details: Recorded on MiniDV by Sony 2100 and later captured on Hard Disk in .avi format. If you like to have a look i can upload some part of the video on the internet and share it with you. Hope to get your answer soon. Cheers,
Amit
Hi Amit,
I would like to take a look, yes.