The information on this page is no longer relevant since RTMP streaming requires Flash, which ahs been condemned to death by the developer community. We leave this article in for history sake.
To avoid problems with streaming video and audio, in particular private streaming, the way to go is to start with a fresh S3 AWS bucket without any content in it. Decide upfront which bucket is going to contain media for streaming and which one for private streaming. This way, you avoid confusion about the nature of certain media in your bucket(s). We are going to concern ourselves here only with the private streaming bucket in this article.
Depending on the application you us, all media that is uploaded afterward will inherit the settings of the bucket. That is, if you indicate it to do so.
For CloudBerry S3 Explorer, this is the checkbox Apply for all subfolder and files. This can be found under the ACL settings when you right click on the bucket you want to work with.
The AWS console
The AWS Management Console from S3 Amazon itself is for various reasons not the ideal partner to work with because it presumes you have technical knowledge about nearly every aspect. Therefore, it is cumbersome and doesn’t have the options the standalone applications have. To name a few things, uploading big files via a browser is very slow, you have to write bucket policies for private streaming by hand and navigation in the console is very slow as well. In short, forget the console when it comes to advanced settings.
Instead, use CloudBerry S3 Explorer – affiliate link- (Windows) or Cyberduck(Mac) for this.
What happens when I do not start with a private streaming bucket before uploading content?
Your media won’t be set properly for streaming. This can lead to strange results. Typical behavior is a loading wheel that keeps turning and turning and nothing happens. This can have other causes as well, but given the fact that the media has been uploaded before you set the bucket to private streaming indicates in which direction you have to look first:
Chances are that the setting of your permission on S3 AWS is wrong and there is a very simple test to verify this, even without the aid of a standalone application like CloudBerry S3 Explorer or Cyberduck:
Go to the AWS Management console and login: https://console.aws.amazon.com/ec2/home
- Click on the tab Amazon S3.
- Then click on the bucket you want to examine in the left hand pane.
- Select a video or audio that creates problems on your site and right-click on it.
A dialog box shows up, like this:
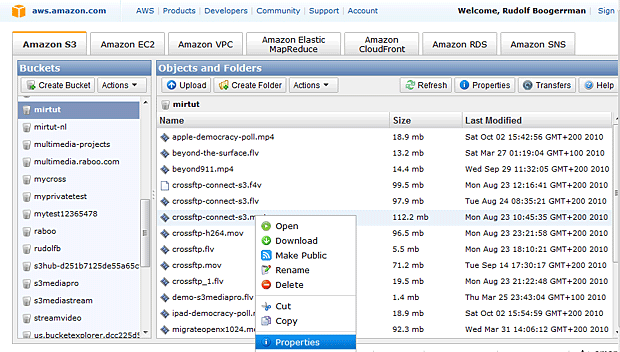
Select Properties and click on the tab Permissions in the properties box that shows up. This will give you something like this:
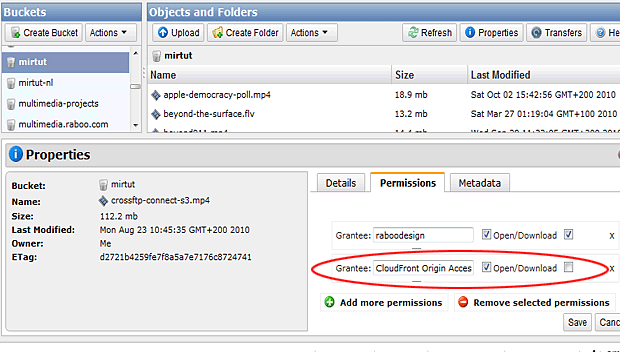
If you do not see the Grantee: CloudFront Origin Access, you have a problem. Not a big one, but a problem nevertheless. This is the direct result of turning the bucket into a streaming distribution AFTER you uploaded a series of video or audios. OK, now that we pinpointed that problem, how do we solve it?
Three options to solve Cloudfront distribution problems
- Option 1 is the easiest but rather drastic as you have to re-upload everything in the bucket.
- Option 2 is work intensive as you set permissions per object
- Option 3 is the best method but not that easy for non technical people.
Option 1:
is the easiest: delete all streaming media from the bucket. Then download and install either CloudBerry S3 Explorer (Windows) or Cyberduck(Mac). Then set the account in the application. There is a tutorial on how to get your S3 access key here: www.miracletutorials.com/s3-amazon-signup-connect/
Once you have done that, go to the bucket you want to work with, right click on it and select ACL settings. Tick the box Apply for all subfolder and files and then upload the media again using the application instead of the console. In this way, all media inherit the permissions from the bucket, thus including the CloudFront Origin access settings needed in order to stream the video or audio on your site.
In other words, if you set the bucket to private streaming, all media that you upload after the change will become private too.
Now, in some cases you may have uploaded media beforehand AND afterward. In that event, option Two or Three will be better for you because some media files will have inherited the proper settings while others don’t.
Option 2:
Add the CloudFront Origin Access grantee manually for each media file that does not have it.
OK, that sounds totally of the wall, but fear not, I’ll explain how to do that with CloudBerry S3 Explorer.
Add a CloudFront Origin Access grantee with CloudBerry S3 Explorer
Open CloudBerry S3 Explorer and right click on the bucket you are working with. then select Streaming.
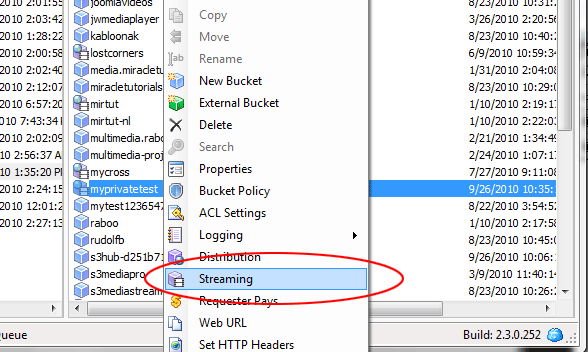
After that, a dialog box shows up with several tabs. Select Private Content:
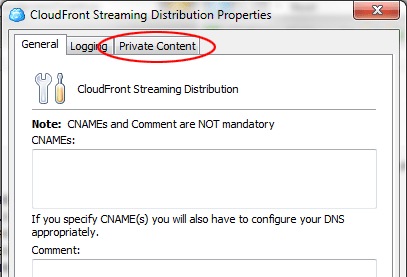
If it is not already set, when you click the checkbox Enable Private Content Distribution, everything is set automatically. Here you find the ID that you need to create the CloudFront Origin Access:
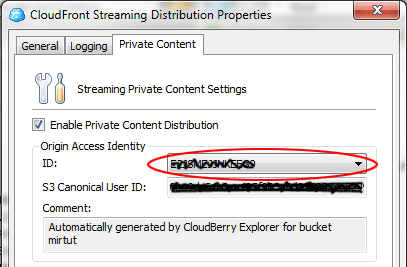
Write this ID existing of numbers and alpha character down. Now, close this box, double click on the bucket and select the video or audio you want to make private. then right click on it and select ACL Settings from the options box:
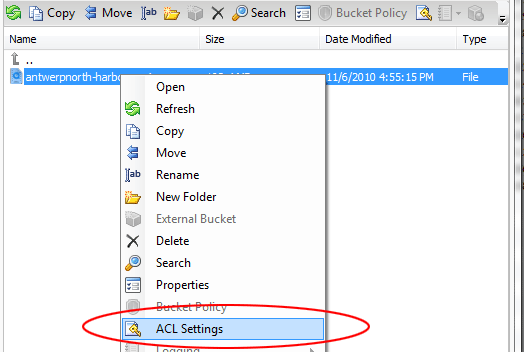
As said before, the ACL settings often give a clue if something is not working properly, especially with private streaming. As you can see in the screen shot below, something is missing there! The CloudFront Origin Access was not added automatically, so we are going to add it by hand:
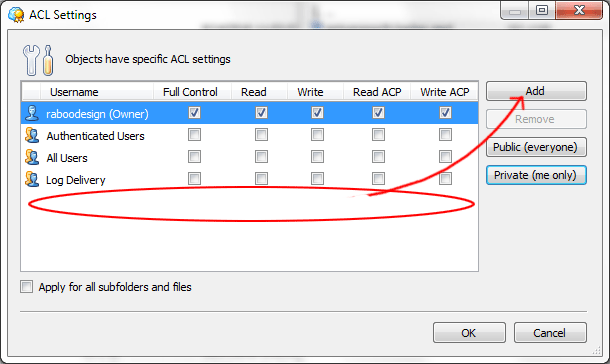
Click the Add button to add a new grantee, or username as they call it in CloudBerry S3 Explorer. A new dialog box shows up:
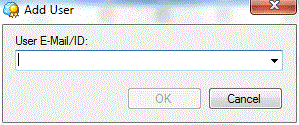 Here, in the E-mail/ID field, you type the string you wrote down just earlier on. The OK button will become active, click on it when you are done. The ACL settings will look now like the screen shot below:
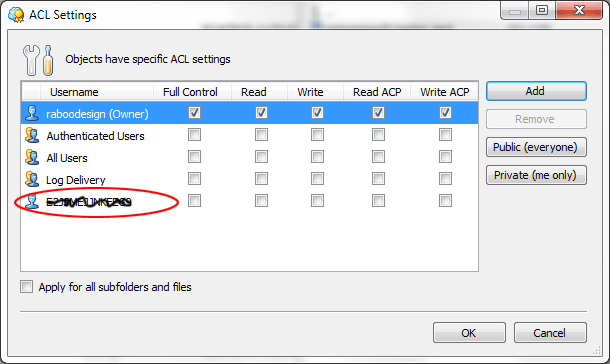
The last thing you need to do now is to set that new user to Read, like this:
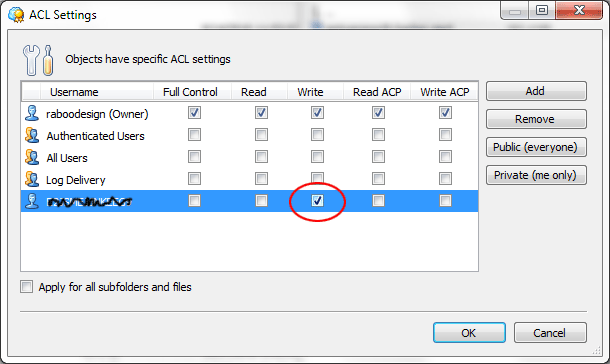
Click OK. You are done with this media file. Now if you would right click on that file again and select ACL settings, you will notice that in place of the string you added, it will say CloudFront Origin Access, like in this screen shot. This tells you everything is fine with this file now:
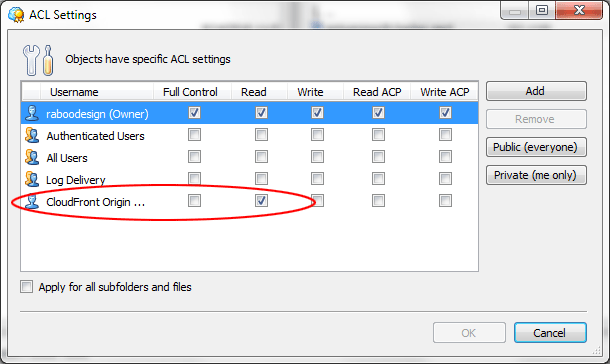
In the sample above, the media file is set to private streaming. This is how you can fix your private streaming manually.
Option Three:
adds the correct ACL settings on all objects, whether they were uploaded later or earlier. This is a rather advanced method that requires a couple of extra steps. Here is a tutorial from CloudBerry Lab to work this out with CloudBerry S3 Explorer Pro:
http://blog.cloudberrylab.com/2010/09/how-to-grant-permissions-to-cloudfront.html
![]() Remember, if you have a problem with a private streaming video or audio, check the ACL settings first!
Remember, if you have a problem with a private streaming video or audio, check the ACL settings first!

Wow, this is a great tutorial, the best I’ve ever seen on the subject I wish I had read it before I set up my account on S3 and upload files from the console!