The last part of this series: Preparing your video for streaming, uploading and embedding the video, branding your site and the video player. After those steps, you truly will be able to run your own video channel. However, this is the most challenging part of the series. Retrace your steps if things go wrong and start again at the beginning of this part or even step back to previous parts (links at the bottom).
If you have a problem, write a comment here and we will try to help you out.
Preparing your video for streaming
Ideally, a video is up to10Mb-15Mb in weight, with a maximum data rate of 200Kb to 250Kb per second. That way, nearly everyone with a reasonable connection will be able to view your video without glitches.
Most video editors have the option to control the data rate. Data rate is the amount of kilobytes per second that is transferred from your server (where your website resides) to the clients computer. This is how we control the “streaming” of your video. For the record, FLV movies are not really streaming movies, they more or less simulate the process. For real streaming you need special server software. But this method works fine, so don’t lose any sleep over it. Unless you want to build a mega site, you won’t need special server software.
What format to use for my videos?
The typical format for a video channel is FLV, or Flash for Video. The reason is that most viewers can view this type of videos because the plugin used to display the video is installed on more then 98% of the computers worldwide.
In most cases, the video from your camcorder is not FLV, but another format like AVI, WMV, MOV, MPEG, MP4, etc … Therefore, it needs to be converted to FLV. Exporting video to FLV is a typical process that is practically the same on every video editor. By showing you how this works with the videos below (found in the member area), you will be able to do it in every video editor, although they may have additional native options.
In the member area is a set of video tutorials related to FLV export:
- Use FTP to upload video for FLV conversion
- Convert uploaded video to FLV in the DreamHost panel (for those of you who have an account with them. )
- Exporting to FLV in Vlog It-Adobe
A short list of video applications that can export to FLV:
- QuickTime Pro (Mac & PC)
- Camtasia, Techsmith (PC)
- Adobe Premiere (Mac & PC)
- Adobe AfterEffects (Mac & PC)
- Final Cut Express (Mac)
- Final Cut Pro (Mac & PC)
- Vlog It (PC)
- iMovie (Mac)
- …
There is also a free FLV converter:
http://www.brothersoft.com/afree-mov-to-avi-flv-mpeg-wmv-converter-download-79111.html
I didn’t test it myself because it would overwrite existing codecs already installed on my computer and I’m sure the commercial codecs are better then the free ones, so I didn’t want to risk it at the moment of working on this tutorial. That doesn’t mean you shouldn’t give it a try. Best create a System Restore Point (Windows) before installing any video converter on your computer, so that you can restore the original configuration if things turn out wrong. If you do not know how to do that, here is a short tutorial from Microsoft.
Before you read on: make sure you have an FLV video ready.
2 options to upload a video
At this stage, I presume you have a FLV video ready for publishing. OK, let’s upload it then! We have 2 options to do that, namely:
- Via the admin section of WordPress or Joomla,
- Via FTP
1. FTP
Personally, I prefer FTP because it is much faster then uploading via your browser. Another reason is that there are restrictions on the weigth you can upload via your content management system. To overcome this limit, you’ll have to involve a web developer or server master to raise the maximum limit if you want to upload videos bigger then 10MB or so. You also may want to check with your hosting provider. They might not let you change the limit.
Either way, in the member area is a video tutorial Use FTP to upload a video for fLV conversion. This shows how to upload a video through FTP with the free FTP appplication FileZilla.
Working with, and installing an FTP application is also covered in Installing FileZilla (FTP application) & upload WordPress template in Creating your own video channel – part 3.
2. Admin section uploads
To upload via the admin section of WordPress, view the video in the member area Placing a video in WordPress & brand the player , where it is explained how to upload a video via the admin section of WordPress. It also shows how to install a good FLV plugin and how to brand your player (more details below).However, make sure the video you want to upload is not bigger then 10Mb or the upload probably fails.
Branding your player
You can do several things to brand the player as your own. The most significant option is to add a logo that floats over your videos and set a poster image for every video separately. A posrer image is the images that shows when your vidoe loads, initially.
There are other options as well, but we won’t discuss those here as they are too advanced at this stage, but they will be covered in later tutorials.
If you want to jump ahead and know all about the configuration of the player, here is all the detailed information on Jeroen’s site, the author of the Flash video Player >>. (I hope his site is up again).
Branding your site
The easiest way to brand your site is to create an image that is exactly the same size as the current logo or image at the top of the site. In order to do that, you need to know 3 things:
- Where is the image
- What is it called?
- What are the dimensions in pixels (width, height)
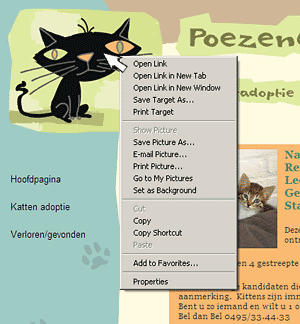
Generally, your browser will give you the answer if you right click on top of the image or logo:
You will see something like this in Iexplorer:
And in FireFox, you see this:
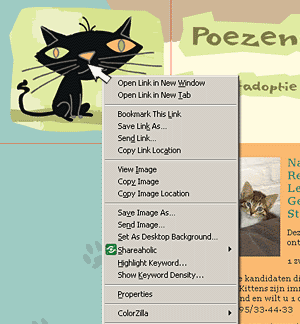
In both browsers, and in fact in nearly all browsers, you will see the menu option Properties in that popup. Select it to see the details of the image.
You will get something like this:
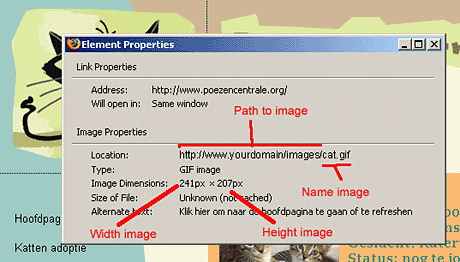
At Location, you see the path to your image. Select that line, copy it and paste it in a text file.
The part including the last Slash “/” is the path, the rest is the name of the image.
Below that, you will find the width and height of the image.
Jot that down as well. You have now all the details you need. Again, right click on the image and select, Save as.
Save it wherever you want and if you are familiar with image editors, then open it with your image editor and adapt the image according to your needs. Otherwise, consult a graphic designer and let him/her design a header for you. You will need to give this person the details you just wrote down.
Either way, when the image is finished, you have to upload it to your web space, in the folder where the original came from. In fact, you will overwrite the original image. That way, you do not need to change the code in the template and your new image will show up on all pages (unless the template has different images for some section (consult the manual of the template for this).
There is a video tutorial in the member area: Branding your WordPress site which visually shows this process in the member area under the section Creating your own video channel – part 4.
(all video tutorials from previous articles will move to the member area soon).
HELP, I don’t get image information when I hover over a header image! What now?
In Joomla and some WordPress themes, logo images are often displayed as background images and therefore difficult to find out the details you need.
We use a workaround for this which is explained in the video tutorial Branding your Joomla site in the member area under the section Creating your own video channel – part 4.
This concludes the series and I hope you will find this tutorial series useful. More advanced tutorials on this topic will follow. Stay tuned 🙂