 In this part, which is meant for S3 Amazon account holders, we are going to focus on streaming video. Streaming has a lot of advantages, which are explained in S3 Streaming video with CloudFront. One extra perk not discussed in that article is important: when you use HD switching, the HD video picks up where the low resolution version left off and vice versa.
As you perhaps remember from part 1of this tutorial, without streaming, every time you switch between the two modes full screen and page view, the video starts from the beginning again. With streaming the video keeps playing wherever you are in the time line, which makes more sense.
For instance, your visitor is watching the video in the page and decides that he wants to see more detail, so he clicks on the full screen button. Now he gets the HD video which does not go back to the beginning but keeps in playing where it was. After a minute or so, the video stutters because the connection isn’t that good.
Your visitor gets impatient and presses ESC (Escape) to get to the page view again. There the smaller version plays further without hickups. That is the true power of HD switching combined with streaming!
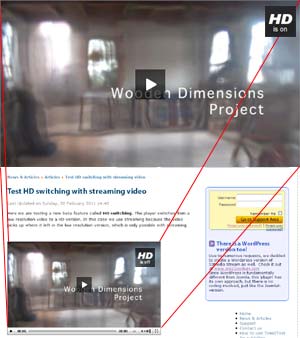
You can test this out here: HD switching demo
However, streaming is not something you can do so easily, unless you use a service like S3 Amazon/CloudFront and upload your videos there. S3 Amazon has streaming software installed, so you do not have to worry about the technical details of setting up server software. I’m not going to explain every nut and bold of S3 Amazon (S3 AWS). On the left, there is a category called S3 Amazon/CloudFront, where you find a whole range of articles to get started with the service. Here we are going to pick up where we left off in part 1.
Preparing the HD switching code for streaming
I presume you read part 1 and have JW mediaplayer installed and that you uploaded your low and high resolution version of the same video to your S3 Amazon account. If you do not know how to configure your bucket for streaming, have a look here: http://blog.cloudberrylab.com/2009/12/how-to-configure-cloudfront-streaming.html
OK, now that is out if the way, we can look into the code. As with the code in part 1, it looks like horror, but you only need to concern yourself with the red bold parts which you have to customize. Just copy the code below and put it in a Simple text file(Mac) or Notepad(Win). Do not use a rich text editor because it adds unwanted formatting:
<scripttype=“text/javascript”src=“http://www.yourdomain.com/jwplayer/jwplayer.js”></script>
<div id=”myvideo”>Load the player…</div>
<script type=”text/javascript”>
<!–-
jwplayer(’myvideo’).setup({
‘flashplayer’: ‘http://www.yourdomain.com/jwplayer/player.swf’,
‘wmode’: ‘transparent’,
‘allowscriptaccess’: ‘always’,
‘allownetworking’: ‘all’,
‘file’: ‘myvideo-lowres.mp4‘,
‘width’: 600, ‘height’: 500,
‘allowfullscreen’: ‘true’,
‘controlbar’: ‘bottom’,
‘streamer’: ‘rtmp://xxxxxxxx.cloudfront.net/cfx/st’,
‘plugins’:{ ‘hd{ file: ‘myvideo-hd.mp4‘,
‘fullscreen’: ‘true’}
}
});
//–->
</script>
As in part 1, you have to change the red parts in http://www.yourdomain.com/jwplayer/jwplayer.js and ‘flashplayer’: ‘http://www.yourdomain.com/jwplayer/player.swf’, to reflect your situation. You might have called the folder jwplayer differently and obviously, yourdomain.com is different too. Also the width and height can be different, as in ‘width’: 600, ‘height’: 500,
When you compare this with the code in part 1, you see that a couple of things have changed:
‘file’: ‘myvideo-lowres.mp4‘,
‘streamer’: ‘rtmp://xxxxxxxx.cloudfront.net/cfx/st’,
‘plugins’:{ ‘hd{ file: ‘myvideo-hd.mp4‘,
First of all, the ‘file’: ‘myvideo-lowres.mp4‘, is no longer the full path to the video, it only shows the name of the video. Same with this part:
‘plugins’:{ ‘hd{ file: ‘myvideo-hd.mp4‘, which is the name of high resolution version of the video itself, nothing more.
And there is an extra line:
‘streamer’: ‘rtmp://xxxxxxxx.cloudfront.net/cfx/st’,
‘streamer’ indicates the path to the streamer software on your S3 account and at the same time the streaming distribution where your videos are. The only part you need to adapt is are the xxxxxxxx. This needs to be replaced by the streaming distribution name. You can find that in the AWS console of S3 Amazon under the CloudFront Distributions tab:
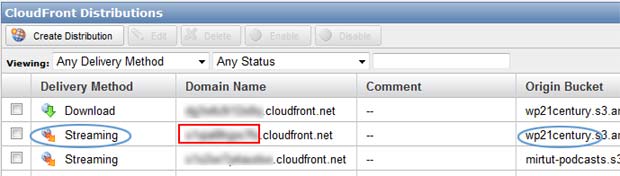
You only need to copy the string before .cloudfront.net. Make sure you select the Streaming distribution, not the Download distribution. You can check that in the left column. On the right you see the original bucket name. That way it is easy to locate the correct distribution. You can also use another S3 application like CloudBerry S3 Explorer to look up those values.
In any case, the line of code should now look similar to this:
‘streamer’: ‘rtmp://s25ghtbso26.cloudfront.net/cfx/st’, where s25ghtbso26 is a fictitious example in this case.
To resume, your full code should now resemble something like this:
<scripttype=“text/javascript”src=“http://www.yourdomain.com/jwplayer/jwplayer.js”></script>
<div id=”myvideo”>Load the player…</div>
<script type=”text/javascript”>
<!–-
jwplayer(’myvideo’).setup({
‘flashplayer’: ‘http://www.yourdomain.com/jwplayer/player.swf’,
‘wmode’: ‘transparent’,
‘allowscriptaccess’: ‘always’,
‘allownetworking’: ‘all’,
‘file’: ‘myvideo-lowres.mp4‘,
‘width’: 600, ‘height’:500,
‘allowfullscreen’: ‘true’,
‘controlbar’: ‘bottom’,
‘streamer’: ‘rtmp://s25ghtbso26.cloudfront.net/cfx/st’,
‘plugins’:{ ‘hd{ file: ‘myvideo-hd.mp4‘,
‘fullscreen’: ‘true’}
}
});
//–->
</script>
That’s it! Now that you changed all the code to your custom situation, copy the full code from your text editor and paste it in your page. If you work with a content management system like WordPress, Joomla, Drupal, etc… make sure you paste the code in the html mode editor, not the visual editor. You can put this code either before, after or in the middle of text content if you want.
This concludes the second part of this tutorial. I hope you find it useful.
Do you need to have a jwplayer.js file for every MP4 file ? Because it seems you have to specify the MP4 file inside the jwplayer.js ?
It seems also that you just use your web distribution URL and specify the MP4 file there. So I’m not sure why the JWplayer.js is necessary
Since HD switching is a JW Player feature, you need that js file, yes. But I think FlowPlayer has that also. Still, it will also require its own js file.
That said, RTMP streaming is on its way out since Flash will be deprecated. The new rage is HLS adaptive streaming which doesn’t require a separate HD file. See also https://www.miracletutorials.com/embed-hls-adaptive-streaming-video/
In any case, you only need to place a link the the js file in the header of the page once. There is no need to link it for each video.
But I saw that I didn’t read your comment properly. You don’t need to place a link to the mp4 in the js file, you only do that in the embedding code which is separate from the javascript.